@ A3
Drawing Title
DrawingNo.
Project No.
ISO
A3
-
297mmx420mm DATE REVISION REV
Drawn
Checked
Rev.
DRW CHK
Sheet Status
Date
Date
Scale
This drawing must not be used, reproduced or
revised without written permission.
This drawing shall not be used for
construction purposes until the
“CONSTRUCTION” status appears under the
Sheet Status.
Constructors must only work to figured
dimensions which are to be checked on site.
Do not scale from hard copy drawings
Project Name
An Ingenium International Company
NORR Consultants Limited.
This drawing has been prepared solely for the use
of
and there are no representations of any kind
made by NORR Consultants Limited to any party
with whom NORR Consultants Limited has not
entered into a contract
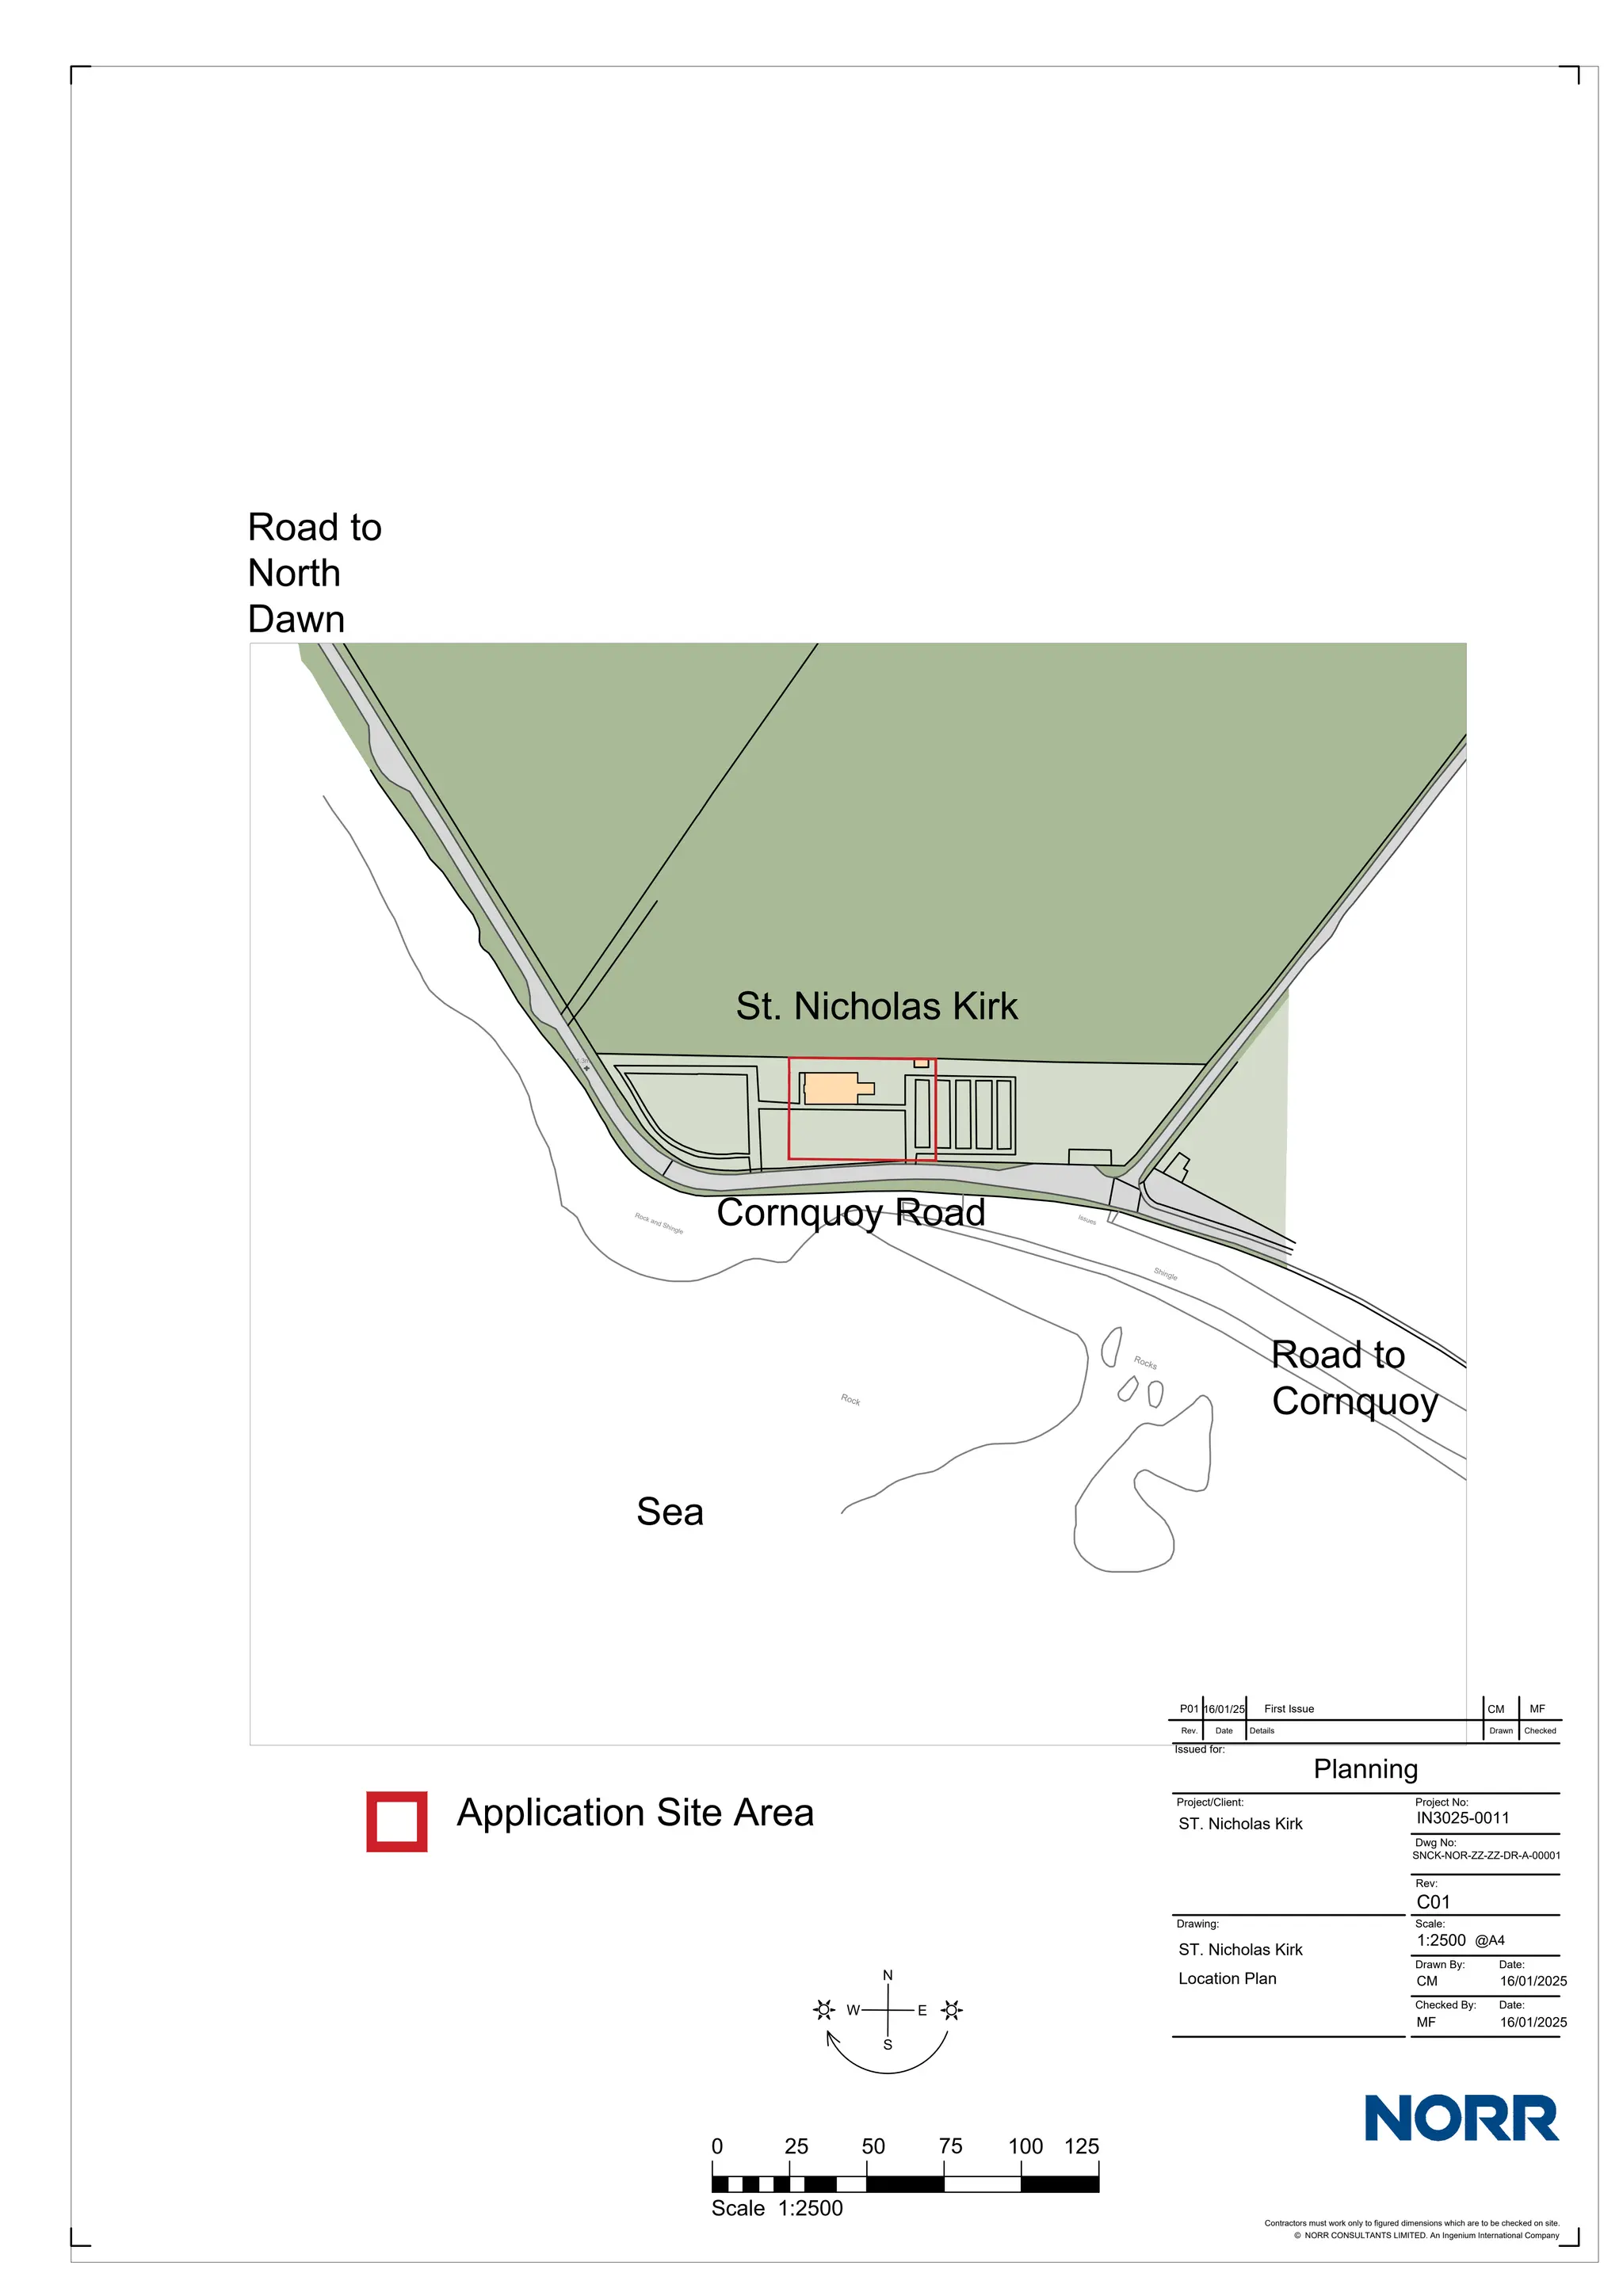
St. Nicholas Kirk
St. Nicholas Kirk
1:200
16/01/2024
MF
16/01/2024
CM
P01
IN3025-0011
Planning
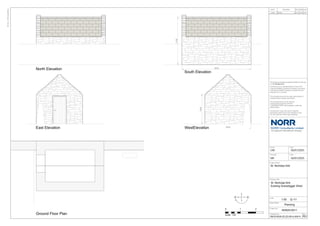
St. Nicholas Kirk
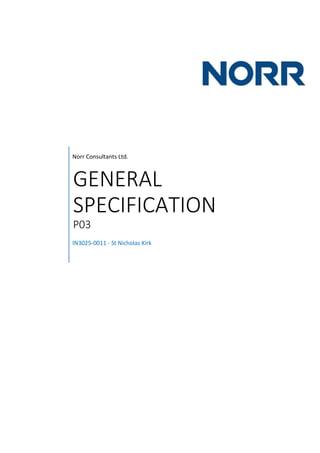
Existing Site Plan
SNCK-NOR-ZZ-ZZ-DR-A-00010
First Issue P01 CM MF
16/01/25
0
Scale 1:200
2 4 6 8 10
Application Site Area
N
S
E
W
3.
@ A3
Drawing Title
DrawingNo.
Project No.
ISO
A3
-
297mmx420mm DATE REVISION REV
Drawn
Checked
Rev.
DRW CHK
Sheet Status
Date
Date
Scale
This drawing must not be used, reproduced or
revised without written permission.
This drawing shall not be used for
construction purposes until the
“CONSTRUCTION” status appears under the
Sheet Status.
Constructors must only work to figured
dimensions which are to be checked on site.
Do not scale from hard copy drawings
Project Name
An Ingenium International Company
NORR Consultants Limited.
This drawing has been prepared solely for the use
of
and there are no representations of any kind
made by NORR Consultants Limited to any party
with whom NORR Consultants Limited has not
entered into a contract
St. Nicholas Kirk
St. Nicholas Kirk
1:200
16/01/2024
MF
16/01/2024
CM
P01
IN3025-0011
Planning
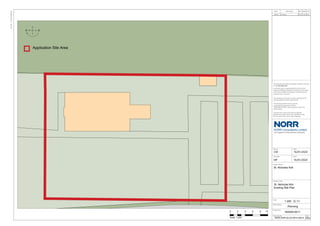
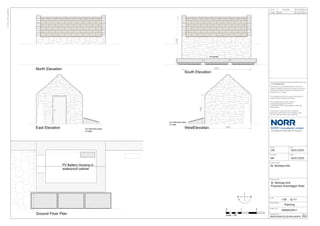
St. Nicholas Kirk
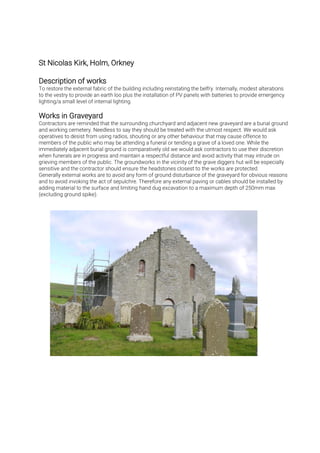
Proposed Site Plan
Application Site Area
SNCK-NOR-ZZ-ZZ-DR-A-00011
N
S
E
W
First Issue P01 CM MF
16/01/25
0
Scale 1:200
2 4 6 8 10
Cable Route
Cable Route
Rainwater drain
Ground mounted PV panels
Rainwater drain
Rainwater
soakaway
Rainwater drain
Reinstate gravel to path
Rainwater soakaway
Rainwater soakaway
Rainwater soakaway
4.
Step
Step
Ramp
Stair
Step
Step
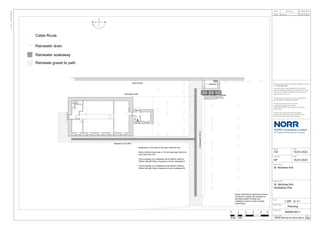
PV Battery Housingin
waterproof cabinet
PV Panels of preformed bases filled with Type 2 fill to
anchor them, placed on salvaged flagstone base flush with
existing ground level with salvaged flagstone on edge to
sides cut to slope of PV panel.
Form
waterless
closet
28343
32613
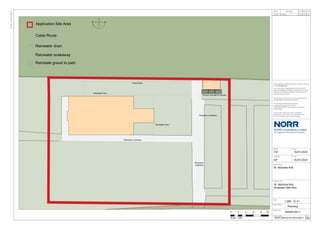
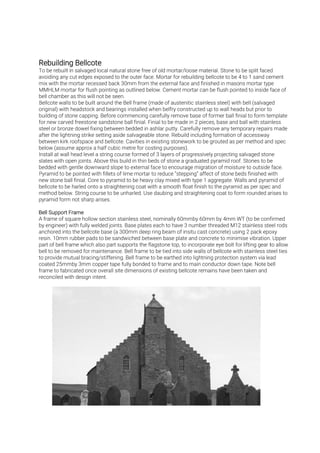
Soakaway on the basis of 5m3 per 100m2 of roof.
Roof is 254m2 (Each side is 127m2) requiring 6.35m3 for
each half of the roof.
This is equates to a soakaway trench 560mm wide by
300mm tall with 50mm of gravel on top for soakaway A.
This is equates to a soakaway trench 640mm wide by
300mm tall with 50mm of gravel on top for soakaway B.
Soakaway A 32.65m
Soakaway
B
28.3m
@ A3
Drawing Title
Drawing No.
Project No.
ISO
A3
-
297mmx420mm DATE REVISION REV
Drawn
Checked
Rev.
DRW CHK
Sheet Status
Date
Date
Scale
This drawing must not be used, reproduced or
revised without written permission.
This drawing shall not be used for
construction purposes until the
“CONSTRUCTION” status appears under the
Sheet Status.
Constructors must only work to figured
dimensions which are to be checked on site.
Do not scale from hard copy drawings
Project Name
An Ingenium International Company
NORR Consultants Limited.
This drawing has been prepared solely for the use
of
and there are no representations of any kind
made by NORR Consultants Limited to any party
with whom NORR Consultants Limited has not
entered into a contract
St. Nicholas Kirk
St. Nicholas Kirk
1:200
16/01/2024
MF
16/01/2024
CM
P01
IN3025-0011
Planning
St. Nicholas Kirk
Soakaway Plan
SNCK-NOR-ZZ-ZZ-DR-A-00012
N
S
E
W
First Issue P01 CM MF
16/01/25
0
Scale 1:200
2 4 6 8 10
Cable Route
Cable Route
Rainwater drain
Ground mounted PV panels
Rainwater drain
Reinstate gravel to path
Rainwater soakaway
Shown Gravestone positions not exact.
Contractor to agree with architect on
site final position of cable and
soakaway routes to avoid crossing
burial layers.
5.
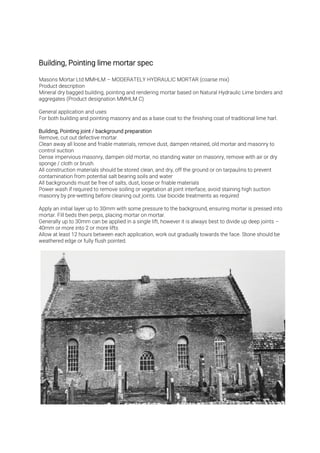
3050
1950
3150
4550
P01
17/01/25 First IssueCM MF
SNCK-NOR-ZZ-ZZ-DR-A-00015
@ A3
Drawing Title
Drawing No.
Project No.
ISO
A3
-
297mmx420mm
DATE REVISION REV
Drawn
Checked
Rev.
DRW CHK
Sheet Status
Date
Date
Scale
This drawing must not be used, reproduced or
revised without written permission.
This drawing shall not be used for
construction purposes until the
“CONSTRUCTION” status appears under the
Sheet Status.
Constructors must only work to figured
dimensions which are to be checked on site.
Do not scale from hard copy drawings
Project Name
An Ingenium International Company
NORR Consultants Limited.
This drawing has been prepared solely for the use
of
and there are no representations of any kind
made by NORR Consultants Limited to any party
with whom NORR Consultants Limited has not
entered into a contract
St. Nicholas Kirk
St. Nicholas Kirk
1:50
16/01/2025
MF
16/01/2025
CM
P01
IN3025-0011
Planning
St. Nicholas Kirk
Existing Gravedigger Shed
North Elevation
South Elevation
East Elevation WestElevation
Ground Floor Plan
0
Scale 1:50
1 2
N
S
E
W
6.
PV Battery Housingin
waterproof cabinet
3050
1950
3150
4550
P01
17/01/25 First Issue CM MF
SNCK-NOR-ZZ-ZZ-DR-A-00016
@ A3
Drawing Title
Drawing No.
Project No.
ISO
A3
-
297mmx420mm
DATE REVISION REV
Drawn
Checked
Rev.
DRW CHK
Sheet Status
Date
Date
Scale
This drawing must not be used, reproduced or
revised without written permission.
This drawing shall not be used for
construction purposes until the
“CONSTRUCTION” status appears under the
Sheet Status.
Constructors must only work to figured
dimensions which are to be checked on site.
Do not scale from hard copy drawings
Project Name
An Ingenium International Company
NORR Consultants Limited.
This drawing has been prepared solely for the use
of
and there are no representations of any kind
made by NORR Consultants Limited to any party
with whom NORR Consultants Limited has not
entered into a contract
St. Nicholas Kirk
St. Nicholas Kirk
1:50
16/01/2025
MF
16/01/2025
CM
P01
IN3025-0011
Planning
St. Nicholas Kirk
Proposed Gravedigger Shed
North Elevation
South Elevation
East Elevation WestElevation
Ground Floor Plan
0
Scale 1:50
1 2
N
S
E
W
PV panels
Cut Caithness slabs
on edge
Cut Caithness slabs
on edge
7.
Step
Step
Ramp
Stair
Step
Step
Project No.
Drawing No.
DrawingTitle
Detail Symbol
North Arrow
DATE REVISION REV
Keyplan
Consultants
DRW CHK
Rev.
Sheet Status
An Ingenium International Company
NORR Consultants Limited.
Client
Project
Drawn
Checked
Date
Date
Scale
@ A1
This drawing must not be used, reproduced or revised
without written permission.
This drawing shall not be used for construction purposes
until the “CONSTRUCTION” status appears under the
Sheet Status.
Constructors must only work to figured dimensions which
are to be checked on site. Do not scale from hard copy
drawings.
This drawing has been prepared solely for the use of:
and there are no representations of any kind made by
NORR Consultants Limited to any party with whom NORR
Consultants Limited has not entered into a contract.
St. Nicholas Kirk
St. Nicholas Kirk
St. Nicholas Kirk
1:50
14/01/25
MF
14/01/25
CM
P01
IN3025-0011
PLANNING
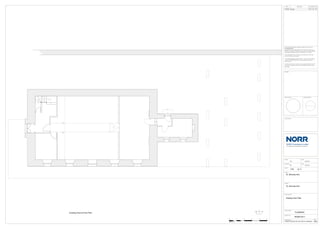
Existing Floor Plan
SNCK-NOR-ZZ-ZZ-DR-A-000050
First Issue MF
CM
P01
14/01/2025
0 1 2 5
3 4
Scale 1:50
Existing Ground Floor Plan
N
S
E
W
8.
Step
Step
Ramp
Stair
Step
Step
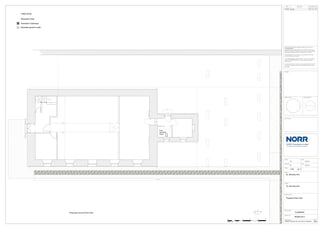
Form
waterless
closet
32613
Project No.
Drawing No.
DrawingTitle
Detail Symbol
North Arrow
DATE REVISION REV
Keyplan
Consultants
DRW CHK
Rev.
Sheet Status
An Ingenium International Company
NORR Consultants Limited.
Client
Project
Drawn
Checked
Date
Date
Scale
@ A1
This drawing must not be used, reproduced or revised
without written permission.
This drawing shall not be used for construction purposes
until the “CONSTRUCTION” status appears under the
Sheet Status.
Constructors must only work to figured dimensions which
are to be checked on site. Do not scale from hard copy
drawings.
This drawing has been prepared solely for the use of:
and there are no representations of any kind made by
NORR Consultants Limited to any party with whom NORR
Consultants Limited has not entered into a contract.
St. Nicholas Kirk
St. Nicholas Kirk
St. Nicholas Kirk
1:50
14/01/25
MF
14/01/25
CM
P01
IN3025-0011
PLANNING
Proposed Floor Plan
SNCK-NOR-ZZ-ZZ-DR-A-000051
First Issue MF
CM
P01
14/01/2025
0 1 2 5
3 4
Scale 1:50
Proposed Ground Floor Plan
N
S
E
W
Cable Route
Rainwater Drain
Reinstate gravel to path
Rainwater Soakaway
9.
9633
4317
5117
2815
2080
10125
5179
9716
22760
Project No.
Drawing No.
DrawingTitle
Detail Symbol
North Arrow
DATE REVISION REV
Keyplan
Consultants
DRW CHK
Rev.
Sheet Status
An Ingenium International Company
NORR Consultants Limited.
Client
Project
Drawn
Checked
Date
Date
Scale
@ A1
This drawing must not be used, reproduced or revised
without written permission.
This drawing shall not be used for construction purposes
until the “CONSTRUCTION” status appears under the
Sheet Status.
Constructors must only work to figured dimensions which
are to be checked on site. Do not scale from hard copy
drawings.
This drawing has been prepared solely for the use of:
and there are no representations of any kind made by
NORR Consultants Limited to any party with whom NORR
Consultants Limited has not entered into a contract.
St. Nicholas Kirk
St. Nicholas Kirk
St. Nicholas Kirk
1:100
14/01/25
MF
14/01/25
CM
P01
IN3025-0011
PLANNING
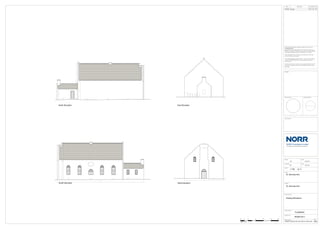
Existing Elevations
SNCK-NOR-ZZ-ZZ-DR-A-000100
First Issue MF
CM
P01
14/01/2025
East Elevation
West Elevation
North Elevation
South Elevation
0 2 4 10
6 8
Scale 1:100
1
10.
9650
4300
5100
2800
2100
10150
12850
1350
5200
9700
22750
Project No.
Drawing No.
DrawingTitle
Detail Symbol
North Arrow
DATE REVISION REV
Keyplan
Consultants
DRW CHK
Rev.
Sheet Status
An Ingenium International Company
NORR Consultants Limited.
Client
Project
Drawn
Checked
Date
Date
Scale
@ A1
This drawing must not be used, reproduced or revised
without written permission.
This drawing shall not be used for construction purposes
until the “CONSTRUCTION” status appears under the
Sheet Status.
Constructors must only work to figured dimensions which
are to be checked on site. Do not scale from hard copy
drawings.
This drawing has been prepared solely for the use of:
and there are no representations of any kind made by
NORR Consultants Limited to any party with whom NORR
Consultants Limited has not entered into a contract.
St. Nicholas Kirk
St. Nicholas Kirk
St. Nicholas Kirk
1:100
14/01/25
MF
14/01/25
CM
P01
IN3025-0011
PLANNING
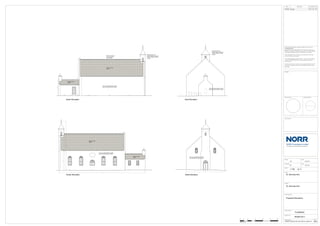
Proposed Elevations
SNCK-NOR-ZZ-ZZ-DR-A-000101
First Issue MF
CM
P01
14/01/2025
East Elevation
West Elevation
North Elevation
South Elevation
0 2 4 10
6 8
Scale 1:100
1
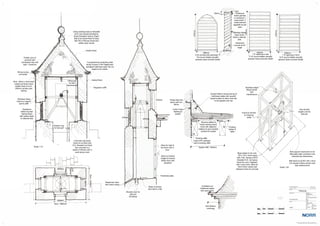
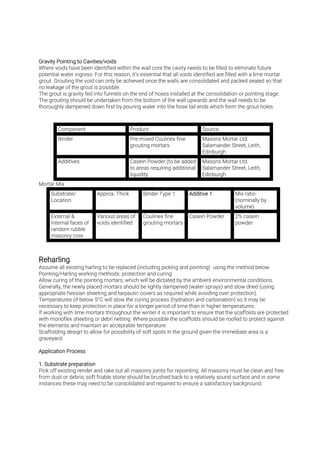
Reinstate bellcote to
original design constructed
in stone & harled to match
existing.
Roof vent removed
and made good to
match existing
Remove existing defective harling,
pick, point and lime harl to match
Remove existing defective harling,
pick, point and lime harl to match
Remove existing defective harling,
pick, point and lime harl to match
Remove existing defective harling,
pick, point and lime harl to match
Reinstate bellcote to
original design constructed
in stone & harled to match
existing.
Repair roof and
repoint
Repair roof and
repoint
Repair roof and
repoint
Repair roof and
repoint
To restore theexternal fabric of the building including reinstating the belfry. Internally, modest alterations
to the vestry to provide an earth loo plus the installation of PV panels with batteries to provide emergency
lighting/a small level of internal lighting.
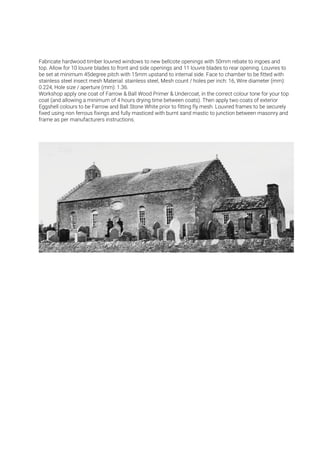
Contractors are reminded that the surrounding churchyard and adjacent new graveyard are a burial ground
and working cemetery. Needless to say they should be treated with the utmost respect. We would ask
operatives to desist from using radios, shouting or any other behaviour that may cause offence to
members of the public who may be attending a funeral or tending a grave of a loved one. While the
immediately adjacent burial ground is comparatively old we would ask contractors to use their discretion
when funerals are in progress and maintain a respectful distance and avoid activity that may intrude on
grieving members of the public. The groundworks in the vicinity of the grave diggers hut will be especially
sensitive and the contractor should ensure the headstones closest to the works are protected.
Generally external works are to avoid any form of ground disturbance of the graveyard for obvious reasons
and to avoid invoking the act of sepulchre. Therefore any external paving or cables should be installed by
adding material to the surface and limiting hand dug excavation to a maximum depth of 250mm max
(excluding ground spike).
15.
To be rebuiltin salvaged local natural stone free of old mortar/loose material. Stone to be split faced
avoiding any cut edges exposed to the outer face. Mortar for rebuilding bellcote to be 4 to 1 sand cement
mix with the mortar recessed back 30mm from the external face and finished in masons mortar type
MMHLM mortar for flush pointing as outlined below. Cement mortar can be flush pointed to inside face of
bell chamber as this will not be seen.
Bellcote walls to be built around the Bell frame (made of austenitic stainless steel) with bell (salvaged
original) with headstock and bearings installed when belfry constructed up to wall heads but prior to
building of stone capping. Before commencing carefully remove base of former ball finial to form template
for new carved freestone sandstone ball finial. Finial to be made in 2 pieces, base and ball with stainless
steel or bronze dowel fixing between bedded in ashlar putty. Carefully remove any temporary repairs made
after the lightning strike setting aside salvageable stone. Rebuild including formation of accessway
between kirk roofspace and bellcote. Cavities in existing stonework to be grouted as per method and spec
below (assume approx a half cubic metre for costing purposes).
Install at wall head level a string course formed of 3 layers of progressively projecting salvaged stone
slates with open joints. Above this build in thin beds of stone a graduated pyramid roof. Stones to be
bedded with gentle downward slope to external face to encourage migration of moisture to outside face.
Pyramid to be pointed with fillets of lime mortar to reduce “stepping” affect of stone beds finished with
new stone ball finial. Core to pyramid to be heavy clay mixed with type 1 aggregate. Walls and pyramid of
bellcote to be harled onto a straightening coat with a smooth float finish to the pyramid as per spec and
method below. String course to be unharled. Use daubing and straightening coat to form rounded arises to
pyramid form not sharp arises.
A frame of square hollow section stainless steel, nominally 60mmby 60mm by 4mm WT (to be confirmed
by engineer) with fully welded joints. Base plates each to have 3 number threaded M12 stainless steel rods
anchored into the bellcote base (a 300mm deep ring beam of insitu cast concrete) using 2 pack epoxy
resin. 10mm rubber pads to be sandwiched between base plate and concrete to minimise vibration. Upper
part of bell frame which also part supports the flagstone top, to incorporate eye bolt for lifting gear to allow
bell to be removed for maintenance. Bell frame to be tied into side walls of bellcote with stainless steel ties
to provide mutual bracing/stiffening. Bell frame to be earthed into lightning protection system via lead
coated 25mmby 3mm copper tape fully bonded to frame and to main conductor down tape. Note bell
frame to fabricated once overall site dimensions of existing bellcote remains have been taken and
reconciled with design intent.
16.
Masons Mortar LtdMMHLM – MODERATELY HYDRAULIC MORTAR (coarse mix)
Product description
Mineral dry bagged building, pointing and rendering mortar based on Natural Hydraulic Lime binders and
aggregates (Product designation MMHLM C)
General application and uses
For both building and pointing masonry and as a base coat to the finishing coat of traditional lime harl.
Remove, cut out defective mortar.
Clean away all loose and friable materials, remove dust, dampen retained, old mortar and masonry to
control suction
Dense impervious masonry, dampen old mortar, no standing water on masonry, remove with air or dry
sponge / cloth or brush.
All construction materials should be stored clean, and dry, off the ground or on tarpaulins to prevent
contamination from potential salt bearing soils and water
All backgrounds must be free of salts, dust, loose or friable materials
Power wash if required to remove soiling or vegetation at joint interface, avoid staining high suction
masonry by pre-wetting before cleaning out joints. Use biocide treatments as required
Apply an initial layer up to 30mm with some pressure to the background, ensuring mortar is pressed into
mortar. Fill beds then perps, placing mortar on mortar.
Generally up to 30mm can be applied in a single lift, however it is always best to divide up deep joints –
40mm or more into 2 or more lifts
Allow at least 12 hours between each application, work out gradually towards the face. Stone should be
weathered edge or fully flush pointed.
17.
Dampen masonry unitsto control suction if required, masonry units should be stored on free draining
clean boards or tarpaulins and covered when not in use
For recovered masonry, work only with cleaned, lichen and moss free units and ensure all old mortar
remnants are removed.
Bonding and laying of masonry units with minimum amount of mortar required to avoid unit to unit contact
is advised, use pinning / gallets for natural stone masonry, correct gauge/ coursing for brick work, prevent
low density concrete blocks from saturation before and after construction
Allow Approx*4-5 litres of clean potable water per bag depending on use. *Water content is a function of
use and should be adjusted by the applicator to suit the conditions and operation being carried out.
For small quantities use hand held drill or whisk type mixer. Mix dry powder into water gradually, start wet,
work to drier consistency For larger mixes pan mixers, paddle mixers are best.
Do not short mix, short mixing requires greater water content and will lead to bleed or shrinkage. Over
mixing can result in weaker mortar. Mix for 3 4 minutes with drill and whisk mixers and for 5 6 minutes for
pans and paddle mixers. For free fall mixers mix 8-10minutes. If hand mixing, mix only small amounts and
ensure the materials are properly mixed, usually around 4 5 minutes of vigorous mixing.
Finish with appropriate tools as the mortar takes its initial set, 6-18 hours depending on mortar designation
and ambient conditions.
Tamping back the surface of the joint with a stiff bristle brush, scraping the joint to open the surface,
tooling the joint or lining out all require consistent placing, mixing, finishing, protection and curing.
18.
Where voids havebeen identified within the wall core the cavity needs to be filled to eliminate future
potential water ingress. For this reason, it’s essential that all voids identified are filled with a lime mortar
grout. Grouting the void can only be achieved once the walls are consolidated and packed sealed so that
no leakage of the grout is possible.
The grout is gravity fed into funnels on the end of hoses installed at the consolidation or pointing stage.
The grouting should be undertaken from the bottom of the wall upwards and the wall needs to be
thoroughly dampened down first by pouring water into the hose tail ends which form the grout holes.
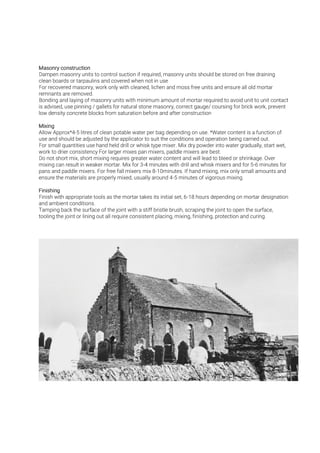
Component Product Source
Binder Pre-mixed Coulinex fine
grouting mortars
Masons Mortar Ltd.
Salamander Street, Leith,
Edinburgh
Additives Casein Powder (to be added
to areas requiring additional
liquidity
Masons Mortar Ltd.
Salamander Street, Leith,
Edinburgh
Mortar Mix
Substrate/
Location
Approx. Thick Binder Type 1 Mix ratio
(nominally by
volume)
External &
Internal faces of
random rubble
masonry core
Various areas of
voids identified
Coulinex fine
grouting mortars
Casein Powder 2% casein
powder
Assume all existing harling to be replaced (including picking and pointing) using the method below.
Pointing/Harling working methods: protection and curing
Allow curing of the pointing mortars, which will be dictated by the ambient environmental conditions.
Generally, the newly placed mortars should be lightly dampened (water sprays) and slow dried (using
appropriate hessian sheeting and tarpaulin covers as required while avoiding over protection).
Temperatures of below 5°C will slow the curing process (hydration and carbonation) so it may be
necessary to keep protection in place for a longer period of time than in higher temperatures.
If working with lime mortars throughout the winter it is important to ensure that the scaffolds are protected
with monoflex sheeting or debri netting. Where possible the scaffolds should be roofed to protect against
the elements and maintain an acceptable temperature.
Scaffolding design to allow for possibility of soft spots in the ground given the immediate area is a
graveyard.
Pick off existing render and rake out all masonry joints for repointing. All masonry must be clean and free
from dust or debris; soft friable stone should be brushed back to a relatively sound surface and in some
instances these may need to be consolidated and repaired to ensure a satisfactory background.
19.
Dubb out previouslyprepared open joints, building out the mortar until flush with the face of the masonry
using Mason’s Mortar MMHLM coarse mix. Incorporate as required pinning stones to avoid large volumes
of mortar accumulating. The mortar must be well compacted to fill any voids and can be finished fairly
rough ‘off the trowel’ to take up its initial stiffening. Prior to hardening, the mortar to be compressed back
with a trowel to ensure a tight bond with the adjacent stone. Finally, the dubbing out coat can be scraped
back with the edge of a trowel to open up the surface to aid the curing process, and also to provide a good
key for the straightening coat.
Straightening coat in MMHLM Coarse mix can be sprayed on to achieve a more uniform finish. For best
adhesion, scraping the mortar from the high points (a plasterer’s straight edge can be used) and filling the
low points as work progresses – do not to overwork or ‘move’ the mortar around too much on the wall as
this can weaken its bond with the background.
Lime harl made up of a mix of 1 part lime to 1.5 sand to 1.5 shale/coarse sand. Lime to be NHL 3.5, Sand
to be 4th
th
barrier sand and shale/coarse sand to be coarse sand and grit with a high coral content.
Harl to be trowel thrown applied and of an even and consistent thickness. Care to be taken to avoid visible
day joints or a visible difference between batches. Scaffold to be designed specifically for purposes of
harling with removable inner boards to avoid the risk of lift linesin the finish. Fairing of render into vertical
returns and reveals and at the base to avoid inconsistent thickness and discourage moisture retention.
Finish coat colour/texture to match original.
20.
Reinstate half roundcast iron guttering with fixing straps fixed below slates to roof battens. Assume new
guttering to all eaves of main and vestry parts of the building excluding new bellcote. Guttering to be
primed and painted before installing with 1 coat Teamac Rapid Dry Red Oxide Primer followed by 2 coats
Teamac Metalcote Enamel, colour black gloss.
Prior to removal photograph base close up inside and out for record purposes and pass to Architect.
Remove former base and make good roof sarking/battens ,slate work and ridgepiece to match existing.
Use salvaged stone slates and stone ridge pieces to match existing. Reinstate stone slates using
austenitic screws or copper nails (assume 2sqm of new roofing)
Generally allow for replacing defective slates including excessively delaminated and cracked slates with
salvaged stone slates to match existing. All fixings should be non ferrous either austenitic stainless steel
screws or copper nails. Remove any cracked loose and defective pointing to roof slates including pointing
where the joints have opened up. Repoint roof with a repointing lime mortar (MMHLM mortar as above)
including all new areas of slating. Assume 60% of roof requires repointing, assume 8sqm of slates require
replacing in addition to roof vent, junction between vestry and main building and local area around bellcote.
Check for daylight in slate work from roof void below to ascertain any hidden areas requiring pointing.
Allow for locally striping roof around the bellcote area back (assume 6sqm in this area) by a nominal
450mm carefully setting aside the useable stone slates for reuse. Make good any uncovered defective
sarking. Install code 4 lead soakers and flashing to junction between roof and belfry and cover with a fillet
of cement mortar in turn this will be harled over with a lime harl. Particular attention should be made to the
south west and North East corners above the areas of existing rot. Allow for stripping off existing
haunching at junction of crow steps to roof on both vestry and main building and reapplying in lime mortar
with a keyed finish to allow harl to be taken over it.
Carefully strip stone slates at junction to a width on approx 350mm min. Inspect exposed sarking/battens
and replace as required. Instal code 4 lead soaker and flashing fully raggled into the wall of the main
building. Reinstate stone slates using austenitic screws or copper nails. Instal cement mortar fillet over
flashing in turn render over this with the lime harl. Note mortar fillet should be scored to act as a scratch
course. Assume 5sqm requiring stripping back and reslating.
Strip off any defective pointing to top of chimney. Install salvaged buff small canon head chimney pot
nominally 300mm high with buff elephants foot vent firmly fixed using sand mastic. Pot to be haunched in
with repointing mix lime mortar.
Generally overhaul and repair. Carefully remove all defective heavily cracked old putty and reputty. Putty
with minor cracks to be retained and cracks filled with putty. Replace any cracked panes with Victorian
Sheet period style glass panes by the London Crown Glass Company. Allow for replacing 12 panes.
Carefully remove rotten cills and scarf and glue in new timber cills where required (allow for4 number).
Rake out defective pointing/mastic to junction between window and ingoes and instal trowel sand mastic
(see below). Allow for 12 linear metres.
Ensure all surfaces are sound, clean, dry and free from dirt, grease and other contamination (assume all
windows). Remove any areas of old paint which are peeling or blistering as flaking or peeling can occur if
you paint over weak paint layers. Blend and “feather” the edges of the old paint fill any cracks, holes and
joints with a water based exterior wood filler. Lightly sand the surface to improve paint adhesion. Apply one
coat of Farrow & Ball Wood Primer & Undercoat, in the correct colour tone for your top coat (and allowing a
minimum of 4 hours drying time between coats). Then apply two coats of exterior Eggshell colours to be
21.
Farrow and BallStone White externally and Farrow and Ball Slipper White internal, allowing the correct
drying time between coats. Please note:
Any new metal fixings must be non ferrous ie either austenitic stainless steel, brass or copper.
Rake out junction between windows and ingoes and apply burnt sand mastic by masons mortars or equal
and approved as per manufacturers instructions. Assume this applies to all windows. Eroded, defective
masonry should be repaired to form a neat edge where practicable to maintain the burnt sand mastic joint
at a consistent size (approximately 10-20mm maximum). Burnt sand mastic is not a masonry repair
material: Where repairs are required to the masonry to maintain a formal edge these should be carried out
and allowed to cure properly before proceeding with mastic work.
Joints that have lost their lime backing and where there is clear space between the frame and the masonry
must be packed, either with well haired lime mortar or a rot proof compressible filler board or backing strip
(Sash and case windows have weight pockets and when filling the gap, care should be taken to ensure
nothing enters the weight pocket and affects the free running of the window – For this reason expanding
foam should be avoided) The gap must be filled to within 10mm of the plane of the ingo without
compromising the weight pocket whilst retaining capacity to support the mastic during troweling on.
The timber frame should have loose flaking paint removed and be fully primed and undercoated before
applying the finished mastic, ideally wood work is best fully finished, although a final finishing coat may be
left until the mastic has properly set.
Check the absorbency of the masonry, repair or render with water as the mastic is oil bound and high
absorbency may occasionally result in bleeding from the mastic into the surrounding masonry.
If the masonry has a high surface absorbency, use tape to protect and mask the masonry to prevent undue
surface spread. (Trail samples should be carried out) Although oil stains usually do evaporate over time,
avoidance is the best option.
Using a small painter’s fitch, neatly apply a small quantity of the oil drier directly onto the frame and
masonry to prime the surface ready to receive the mastic. Keep the primer to the line of the mastic avoid
over priming. This can be done up to 1 hour before applying the mastic (weather dependant). Do not allow
the oil primer to dry fully, apply the mastic while it is still feels tacky to the touch.
Using a mastic trowel and box, press the mastic into the space, filling from the bottom of the joint and
work up, always lay mastic on mastic, do not work to an open face as this will result in poor compaction,
flush the mastic with the face of the Ingo tight to the frame. Where the joint to be filled is less than 10mm it
may be necessary to form a neat angled fillet of mastic, not greater than half the width of the visible casing
facing. The angle of the fillet from the plane of the ingo should not generally be greater than 150 degrees
and in most instances would be flush with the plane of the ingo.
It is important to maintain a consistent margin on the timber frame. Keep tools wiped with an oiled cloth
during the application. After filling, starting from a corner, press the mastic trowel tightly against the face
of the timber frame and masonry jamb and carefully press and draw the trowel to create a neat regular
flush or angled fillet.
Clean away any excess mastic and wipe the finished timber edges on completion. Where tape has been
applied to minimize soiling with oil on absorbent surfaces, after finishing the mastic, remove the tape
immediately, taking care to ensure that the mastic does not pull away with the tape. There should be no
visible lips at the mastic edge on removal of tape.
22.
Fabricate hardwood timberlouvred windows to new bellcote openings with 50mm rebate to ingoes and
top. Allow for 10 louvre blades to front and side openings and 11 louvre blades to rear opening. Louvres to
be set at minimum 45degree pitch with 15mm upstand to internal side. Face to chamber to be fitted with
stainless steel insect mesh Material: stainless steel, Mesh count / holes per inch: 16, Wire diameter (mm):
0.224, Hole size / aperture (mm): 1.36.
Workshop apply one coat of Farrow & Ball Wood Primer & Undercoat, in the correct colour tone for your top
coat (and allowing a minimum of 4 hours drying time between coats). Then apply two coats of exterior
Eggshell colours to be Farrow and Ball Stone White prior to fitting fly mesh. Louvred frames to be securely
fixed using non ferrous fixings and fully masticed with burnt sand mastic to junction between masonry and
frame as per manufacturers instructions.
23.
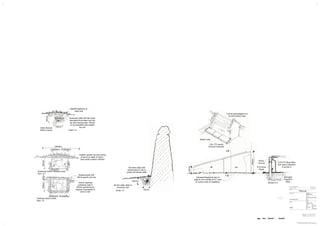
Excavate base areaby hand to a depth of 100mm including turf depth. Lay salvaged flagstones cut to
shape on a bed of coarse sand laid to a gentle fall to the front. Use salvaged flagstones on edge to form
upstands to side and part rear buried to a depth of approx. 100mm and fixed to the base flagstones via
stainless steel brackets at 300mm centres. Top edge of flagstones to be cut to sloped and level profile of
sides and front of PV panels.
Generally the principle is to minimise ground disturbance thereby mitigating uncovering any human
remains. Therefore the principle is to dig to a maximum depth of 200mm (including turf) in conjunction
with locally raising the ground level to conceal cables and soakaways.
Carefully Excavate (preferably by hand digging) shallow trench maximum to a maximum depth of 250mm
below surface level and 300mm wide. Line trench with permeable geotextile leaving enough to dress over
the top. Instal 100mm perforated soakaway pipe and backfill in gravel. Where cutting across grass areas
the ground above should be slightly mounded over with 75mm to 100mm of topsoil and grass seeded with
the topsoil gently graded back into the existing ground. Where below pathways the path to be finished with
50mm deep gravel (2-6mm aggregate with a maximum particle size of 14mm) spread over the whole path
width.
Running from the battery storage into the building half way along the North side of the building adjacent to
the incoming generator feed.
Form a hole in existing west gable of grave diggers hut at ground level, make good and seal hole around
cable. Feed armoured cable from shed along base of boundary wall with marker tape and protected by
discarded slate with seeded top soil feathered over the top. Similar detail from wall into church. Allow for
chasing any exposed cable into wall with stainless steel
Installation of lightning protection to be by qualified sub contractor. Assume lightning rod fixed to stone
finial in turn securely fixed to 25mm by 3mm lead coated copper tape securely fixed to follow finial and
building contours by saddle fixings at nominal 300mm centres down North side of bellcote and down the
angle between main gable and projecting bellcote down to 1200mm nominal depth ground spike. Ensure
stainless steel ball support frame is also earthed with 3mm by 25mm copper tape going through base of
louvred opening and joining main conductor tape.
Form new partition and doorway subdividing the former vestry into 2 small rooms. Form new opening in
timber lined wall, carefully removing and setting aside lining boards and skirting for reuse. New partition to
be 75mm stud with 12.5mm plasterboard both sides and rigid Kingspan acoustic insulation between. New
partition to be finished with new and part salvaged vertical beaded lining boards skirtings and architrave to
match existing. boarding to be stained to match existing and all to be coated with 2 coats of varnish
consisting 50/50 mix of linseed oil sand turpentine. New door (preferably salvaged) to be 4 panel type to
match existing vestry internal door. Door ironmongery to have scotch rimlock
www.inbrass.co.uk/acatalog/scotch-rim-lock.html (to room side), budget brass door knob
www.inbrass.co.uk/acatalog/budget-door-knobs.html and brass escutcheon plate
www.inbrass.co.uk/acatalog/ainslie-escutcheon.html all by Inbrass.
24.
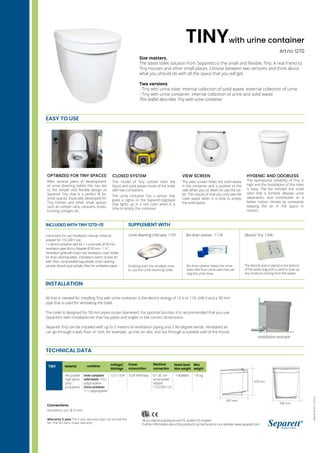
Instal “Separett Tiny”composting toilet with Urinal Container as per manufacturers instructions. Install
50mm ductwork for integral toilet fan terminating in grey mushroom cowel centrally placed below external
window. Pipe to slop gently downwards to external cowel to prevent rainwater entering. Any visible ducting
(not anticipated) to be boxed in in timber to match partition boarding.
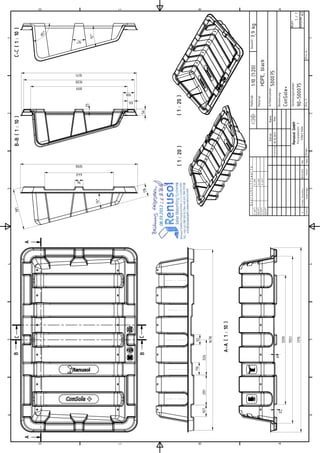
Install ground mounted solar panel system (3 number) using Renusol Console mounting tray or equal and
approved) with JAM60s10 330-350/MR series panels by JA solar or equal and approved. PV panels to feed
into a suitably sized PV battery storage system and any associated inverters etc housed in a waterproof
cabinet in the gravediggers hut. Cable from hut to connect into kirk into existing consumer unit on wall to
balcony stair. Allow for additional units/switches etc to connect into the existing electrical system as part
of contractor design. Avoid surface mounted trunking/cabling unless specifically allowed by architect.
Extract Fan: Install ceiling mounted extract fan powered by PV batteries and switched from lobby area.
Provide ducting through roofspace into former former chimney flue and terminating at new chimney pot.
Extract fan to be powered off pv batteries.
Instal LED ceiling mounted light to new earth toilet switched from lobby side. LED light must be capable of
being run off PV Battery.
Instal photo-luminescent safety signage as indicated on the plan.
Form new access hatch to roof space in vestry lobby. Hatch to have opening size of 600mm by 600mm
with plated out in timber to edges with facings to ceiling matching door facings. Hatch to be made in
beaded timber lining to match partition lining boards. All to stained and varnished to match existing
partition lining. Reinstate/reattach 3 number balusters to stair to balcony (balusters to reinstate are set
down in balcony) Instal timber sloping rail to top of existing balcony edge as per drawing to achieve an
overall height of 800mm. Rail to be painted in eggshell paint to match colour of balcony front.
2 areas of dry/wet rot have been identified in the ceiling. One to the South West corner over the balcony,
the second to the North East Corner, both appear to be related to roof leaks. Both are approximately 1.5 sq
m in area.
Remove affected timber lining boards but retain moulded ceiling ribs if still sound and treat affected area
with brush applied proprietary fungicidal fluid. If couples or ceiling bearers are affected allow for replacing
compromised timber with new pressure treated timber of same section as existing and fixed to existing
members via 400mm long Heavy Duty Galvanised Splice Plate Joining Plates.
Reinstate new lining boards to match existing. Stain and varnish new timber to match existing
(redecoration to affected area only).
Prior to carrying out works suitably protect balcony pews/ existing floor finishes below (including moving
any artifacts such as the ships binnacle, pictures etc).
25.
Plaster repairs (allowfor up to 10sqm area of replacement lath and plaster) to entrance door, lobby and
staircase using MM FHLP + Fibres (feebly hydraulic lime) base coat with minimum 3mm finishing coat of
MM PRF/ PLASTER both by Masons Mortars.
Application instructions
Ambient and materials / surface temperature range to be within 50C – 300C – out with these ranges
consult our technical department. Use control methods to maintain ambient conditions until mortar is
sufficiently cured
Background preparation
Remove, cut out and repair defective plaster, repair defective timbers and laths.
Clean away all loose and friable materials, remove dust, dampen retained, old mortar and masonry to
control suction. All backgrounds must be free of salts, dust, loose or friable materials
Install timber lath. Gaps between laths should be approximately 8-10mm and for riven lath will vary
according to the lath shape and thickness and species. Lath must be break and but bonded, sawn lath
should be break and but bonded, diagonal on ceilings in a herring bone pattern is best for sawn lath
Dampen masonry units to control suction if required – a pricking up coat / spatter dash coat may be
required on very high suction backgrounds. Ensure laths are damp before application – no standing water
on any background
Do not over work surface of mortar on lath work, ensure consistent rivet formation
Apply in accordance with general site specifications
Allow adequate curing times between applications
Apply a minimum coat of MM PRF Plaster with a float finish flush with surrounding existing plaster. Once
cured paint new plaster areas with a farrow and ball estate matt emulsion colour to match surrounding
plaster.
Decoration to be localised to match adjacent areas only. These areas to be as follows:
• New partition to vestry
• Rot eradication areas to main kirk ceiling
• New lath and plaster areas around entrance/underside of balcony, stairs etc
• External doors and windows
• New rail to balcony front
1Sq.M Samples will be required each of the following:
Lime pointing to wall and roofslates
Harl finish coat
Belfry stonework
Stained and Varnished timber
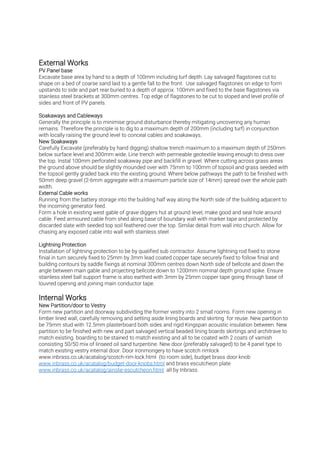
Size matters.
The latesttoilet solution from Separetts is the small and fleixble, Tiny. A real friend to
Tiny Houses and other small places. Choose between two versions and think about
what you should do with all the space that you will get.
Two versions
- Tiny with urine tube: internal collection of solid waste. external collection of urine
- Tiny with urine container: internal collection of urine and solid waste
This leaflet describes Tiny with urine container
TINYwith urine container
Art.no 1270
EASY TO USE
INCLUDED WITH TINY 1270-01
Instructions for use, Installation manual, Universal
adapter for 110-240 V use,
1 x latrine container with lid, 1 x urine tank, Ø 50 mm
ventilation pipe 40 cm, Adapter Ø 50 mm - 1 ½ ”,
Ventilation grille with insect net, Ventilation cowl, Holder
for drain cleaning tablet, Installation sketch, Screws for
wall / floor, compostable bag sample, Drain cleaning
sample, Absorb pad sample, Filter for ventilation pipes
SUPPLEMENT WITH
Urine-diverting child seat 1101 Bio drain cleaner 1118 Absorb Tiny 1346
INSTALLATION
All that is needed for installing Tiny with urine container is the electric energy of 12 V or 110–240 V and a 50 mm
pipe that is used for ventilating the toilet.
The toilet is designed for 50 mm pipes (outer diameter). For optimal function it is recommended that you use
Separett’s own installation kit that has pipes and angles in the correct dimensions.
Separett Tiny can be installed with up to 5 meters of ventilation piping and 2 90-degree bends. Ventilated air
can go through a wall, floor or roof, for example, up into an attic and out through a suitable side of the house.
TECHNICAL DATA
Separett
AB
2021,12375-01
OPTIMIZED FOR TINY SPACES
After several years of development
of urine diverting toilets this has led
to the simple and flexible design of
Separett Tiny that is a perfect fit for
small spaces. Especially developed for
Tiny Homes and other small spaces
such as camper vans, caravans, boats,
hunting cottages etc.
HYGENIC AND ODORLESS
The operational reliability of Tiny is
high and the installation of the toilet
is easy. The fan exhales the small
odor that is formed, despite urine
separation, and contributes to a
better indoor climate by constantly
keeping the air in the space in
motion.
VIEW SCREEN
The view screen hides the solid waste
in the container and is pushed to the
side when you sit down to use the toi-
let. This results in that you only see the
toilet waste when it is time to empty
the solid waste.
The Absorb pad is placed in the bottom
of the waste bag and is used to soak up
any moisture coming from the waste
Enabling even the smallest ones
to use the urine diverting toilet.
Bio drain cleaner keeps the urine
drain free from urine salts that can
clog the urine hose.
Connections:
Ventilation out: Ø 51mm
All our electrical products are ETL and/or CE marked.
Further information about the products can be found on our website, www.separett.com
Warranty 5 year The 5-year warranty does not include the
fan. The fan has a 3-year warranty.
Material container
TINY Voltage/
Wattage
Power
consumtion
Electrical
connection
Noise level
Max weight
Recyclable
high-gloss
poly-
propylene
Inner container
solid waste: 14,5 L
polypropylene
Urine container:
7,1 L polypropylene
12 V / 1.6 W 0.04 kWh/day 61” alt. Uni-
versal power
adapter
110/230V-12V
<30dB(A)
Max
weight
150 kg
CLOSED SYSTEM
This model of Tiny contain both the
liquid and solid waste inside of the toilet
with two containers.
The urine container has a sensor that
gives a signal to the Separett-logotype
that lights up in a red color when it is
time to empty the container.
Installation example
470 mm
497 mm
398 mm