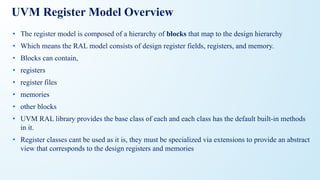
What is verificationmethodology
• Methodology is a systematic way of doing things with a set of standard rules and
guidelines
• Verification methodology means while doing verification we have to follow some
rules and regulations
• Different verification methodologies
• AVM-Advanced verification methodology
• RVM-Reference verification methodology
• OVM-Open verification methodology
• VMM-Verification methodology manual
• UVM-Universal verification methodology
3.
What is Universalverification methodology
• It is a methodology for functional verification using system verilog
• It complete with a supporting library of sv code
• UVM was created by Accellera based on OVM version (Open verification methodology)
• UVM library contains: which can be used for shorthand notation of complex implementation
• Component classes for building testbench components like generator/driver/monitor etc.
• Reporting classes for logging, Factory for object substitution.
• Synchronization classes for managing concurrent process.
• Policy classes for printing, comparing, recording, packing, and unpacking of uvm_object based.
• TLM Classes for transaction level interface.
• Sequencer and Sequence classes for generating realistic stimulus.
• And Macros
4.
Introduction
• UVM isa methodology based on SystemVerilog language and is not a language on its own.
• It enables efficiency in terms of reuse and is also currently part of IEEE 1800.2 working
group.
• Modularity and Reusability – The methodology is designed as modular components
(Driver, Sequencer, Agents , env etc) which enables reusing components across unit level to
multi-unit or chip level verification as well as across projects.
• Separating Tests from Testbenches – Tests in terms of stimulus/sequencers are kept
separate from the actual testbench hierarchy and hence there can be reuse of stimulus across
different units or across projects
• Simulator independent – The base class library and the methodology is supported by all
simulators and hence there is no dependence on any specific simulator
5.
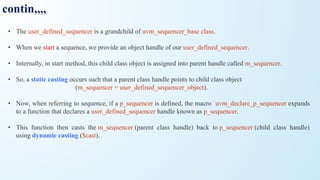
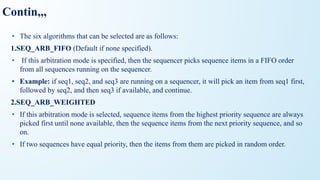
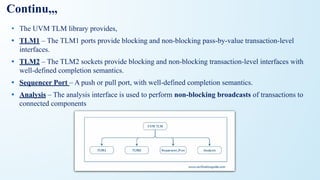
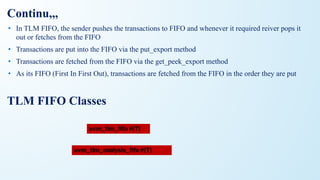
Continu,,,
• Sequence methodology--gives good control on stimulus generation. There are several ways in
which sequences can be developed which includes randomization, layered sequences, virtual
sequences etc which provides a good control and rich stimulus generation capability.
• Config mechanisms--simplify configuration of objects with deep hierarchy. The configuration
mechanism helps in easily configuring different testbench components based on which
verification environment uses it and without worrying about how deep any component is in
testbench hierarchy
• Factory mechanisms--simplifies modification of components easily. Creating each components
using factory enables them to be overridden in different tests or environments without changing
underlying code base.
6.
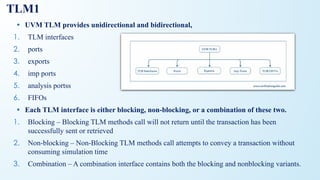
Difference sv anduvm
• SystemVerilog classes allow Object Orientated Programming (OOP) techniques to be applied to
testbenches. The UVM itself is a library of base classes which facilitate the creation of
structured testbenches.
• reporting mechanism- helps in debugging environment with many agents.here we can filter
and log messages with the help of verbosity .by changing the verbosity , printing of messages
can be controlled.severity of messages are fatal , error , warning , info , file name and line
number where file and line are default. Like sv we don't have to give display command again
and again within a class.
• Base class library - here we have inbuilt methods like compare, copy , print , reporting
mechanism , macros which extended class inherits since all the extended class are derived from
same base class.
7.
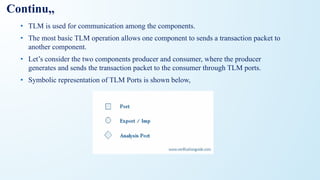
Continu,,,
• Configuration class- config class is a database where we configure all the parameters needed
throughout the hierarchy using set and get .sv we don't not have configuration facility.
• Phasing - since all the components are derived from uvm_ component , phasing helps in
synchronisation of each and every component before proceeding to next phase.
• TLM - in SV mailbox is used for passing the message between component but here tlm that is
transaction level modelling which supports multiple languages and it is port to port connection
not like mailbox which is component to component connection.
8.
Continu,,,
• Factory -here factory is class that manufactures components and objects which gives the ability
to modify and no of objects that makes TB hierarchy in more predictable manner.overriding of
components or objects becomes much more easy using factory concept using create() method
instead of new() method
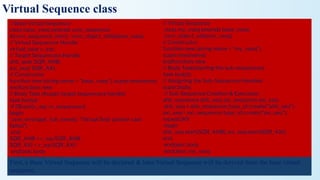
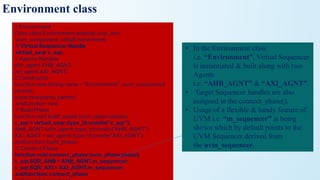
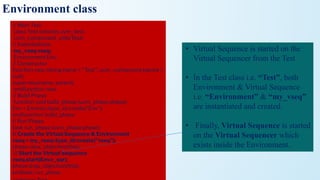
• Virtual sequencer and sequences - for keeping the independency between TB writer and test
case writer .here test case writer don't have to worry about the path in order to start a sequence
which can not be done in SV.
• Reusable and more portable . No need to be dependent on test.able to change the objects from
top level .
uvm_void:
• It isthe base class for all UVM classes.
• This class is the top of the class inheritance hierarchy.
• System verilog has no need for a class that serves as a base of all classes, but specman e need to
have a common root base class, so they added it to the UVM library, but it turns out it is not
needed in the UVM
uvm_object:
• The uvm_object class is the base class for all UVM data and hierarchical classes.
• Its primary role is to define a set of methods for such common operations
as create, copy, compare, print, and record
11.
Contin…
uvm_transaction:
• The ~uvm_transaction~is the root base class for UVM transactions, which, unlike
~uvm_components~, are transient in nature.
• It extends <uvm_object> to include a timing and recording interface.
• Simple transactions can derive directly from ~uvm_transaction~, while sequence-enabled
transactions derive from ~uvm_sequence_item~
uvm_report_object:
• The uvm_report_object provides an interface to the UVM reporting facility.
• Through this interface, components issue the various messages that occur during simulation.
• A report consists of an id string, severity, verbosity level, and the textual message itself.
• They may optionally include the filename and line number from which the message came.
12.
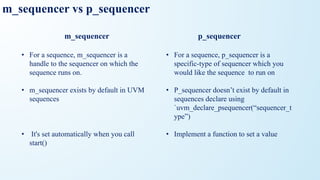
uvm_transaction vs uvm_sequence_item
•uvm_transaction is the base class for modeling any transaction which is derived from
uvm_object .
• uvm_sequence_item is an extension of uvm transaction class.
• A sequence item is nothing but a transaction that groups some information together and also
adds some other information like: sequence id (provide id for sequence_item then easily
identify by the driver), and transaction id, etc.
• It is recommended to use uvm_sequence_item for implementing sequence based stimulus.
• Proper sequencer and Driver communication won't Happen if it is not extending from
sequence_item.
Sequence_item:
• The sequence-itemis written by extending the uvm_sequence_item, uvm_sequence_item inherits from the
uvm_object via the uvm_transaction class.
• Therefore uvm_sequence_item is of an object type.
• The sequence-item consist of data fields required for generating the stimulus.
• In order to generate the stimulus, the sequence items are randomized in sequences.
• Therefore data properties in sequence items should generally be declared as rand and can have constraints
defined.
• Data fields represent the following types of information,
1. Control Information – a type of transfer, transfer size, etc ex:rand bit wr;
2. Payload Information – data content of the transfer ex: rand bit [7:0] wdata
3. Configuration Information – mode of operation, error behavior, etc
4. Analysis Information – fields used to capture information from DUT, ex: output bit[7:0]rdata;
as analysis information fields will be used for capturing response, except these fields the other fields
can be declared as rand and can have constraints associated with it.
16.
class mem_seq_item extendsuvm_sequence_item;
//Control Information
rand bit [3:0] addr;
rand bit wr_en;
rand bit rd_en;
//Payload Information
rand bit [7:0] wdata;
//Analysis Information
bit [7:0] rdata;
//Utility and Field macros,
`uvm_object_utils_begin(mem_seq_item)
`uvm_field_int(addr,UVM_ALL_ON)
`uvm_field_int(wr_en,UVM_ALL_ON)
`uvm_field_int(rd_en,UVM_ALL_ON)
`uvm_field_int(wdata,UVM_ALL_ON)
`uvm_object_utils_end
//Constructor
function new(string name = "mem_seq_item");
super.new(name);
endfunction
//constaint, to generate any one among write and read
constraint wr_rd_c { wr_en != rd_en; };
endclass
Sequence_item example
17.
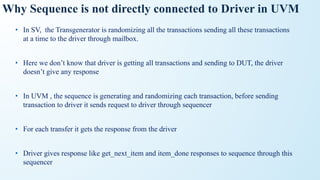
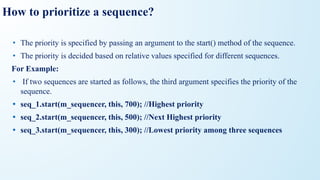
Sequence:
• A sequencegenerates a series of sequence_item’s and sends it to the driver via sequencer,
Sequence is written by extending the uvm_sequence
• A uvm_sequence is derived from an uvm_sequence_item
• a sequence is parameterized with the type of sequence_item, this defines the type of the item
sequence that will send/receive to/from the driver.
class write_sequence extends uvm_sequence
#(mem_seq_item);
....
....
endclass
18.
class mem_sequence extendsuvm_sequence#(mem_seq_item);
`uvm_object_utils(mem_sequence)
//Constructor
function new(string name = "mem_sequence");
super.new(name);
endfunction
virtual task body();
req = mem_seq_item::type_id::create("req"); //create the req (seq item)
begin
(); start_item
assert(req.randomize()); //randomize the req
finish_item(req);
end
endtask
endclass
Sequence example
19.
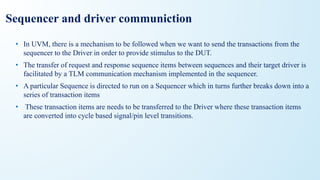
Sequencer
• The sequencercontrols the flow of request and response sequence items between sequences and
the driver
• Sequencer and driver uses TLM Interface to communicate transactions
• uvm_sequencer and uvm_driver base classes have seq_item_export and seq_item_port defined
respectively, User needs to connect them using TLM connect method
driver.seq_item_port.connect(sequencer.seq_item_export);
• A sequencer can be written by extending the uvm_sequencer parameterized with the seq_item
type.
class mem_sequencer extends uvm_sequencer#(mem_seq_item);
`uvm_sequencer_utils(mem_sequencer)
function new (string name, uvm_component parent);
super.new(name, parent);
endfunction : new
endclass : mem_sequencer
20.
class mem_sequencer extendsuvm_sequencer#(mem_seq_item);
`uvm_object_utils(mem_sequencer)
//Constructor
function new(string name = "mem_sequencer");
super.new(name);
endfunction
endclass
Sequencer example
21.
UVM Driver
• Adriver is written by extending the uvm_driver
• uvm_driver is inherited from uvm_component, Methods and TLM port (seq_item_port) are defined for
communication between sequencer and driver
• The uvm_driver is a parameterized class and it is parameterized with the type of the request
sequence_item and the type of the response sequence_item
• UVM_Driver Methods
• get_next_item
• This method blocks until a REQ sequence_item is available in the sequencer.
• try_next_item
• This is a non-blocking variant of the get_next_item() method. It will return a null pointer if there is no
REQ sequence_item available in the sequencer.
• item_done
• The non-blocking item_done() method completes the driver-sequencer handshake and it should be
called after a get_next_item() or a successful try_next_item() call.
22.
class mem_driver extendsuvm_driver #(mem_seq_item);
virtual mem_if vif;
`uvm_component_utils(mem_driver) // Constructor
function new (string name, uvm_component parent);
super.new(name, parent);
endfunction : new
function void build_phase(uvm_phase phase);
super.build_phase(phase);
if(!uvm_config_db#(virtual mem_if)::get(this, "", "vif", vif))
`uvm_fatal("NO_VIF",{"virtual interface must be set for: ",get_full_name(),".vif"});
endfunction: build_phase // run phase
virtual task run_phase(uvm_phase phase);
forever begin
seq_item_port.get_next_item(req); //respond_to_transfer(req);
drive();
seq_item_port.item_done();
end
endtask : run_phase// drive
virtual task drive();
req.print();
`DRIV_IF.wr_en <= 0;
`DRIV_IF.rd_en <= 0;
@(posedge vif.DRIVER.clk);
`DRIV_IF.addr <= req.addr;
if(req.wr_en) begin
`DRIV_IF.wr_en <= req.wr_en;
`DRIV_IF.wdata <= req.wdata;
end
end
endtask : drive
endclass : mem_driver
Driver example
23.
Output Monitor
• Theuser-defined monitor is extended from uvm_monitor, uvm_monitor is
inherited by uvm_component
• Output monitor is a passive entity that samples the DUT signals through the virtual
interface and converts the signal level activity to the transaction level
• Monitor samples DUT signals but does not drive them
• The monitor should have an analysis port (TLM port) and a virtual interface
handle that points to DUT signals.
24.
class mem_monitor extendsuvm_monitor;
// Virtual Interface
virtual mem_if vif;
uvm_analysis_port #(mem_seq_item) item_collected_port;
// Placeholder to capture transaction information.
mem_seq_item trans_collected;
`uvm_component_utils(mem_monitor)
// new - constructor
function new (string name, uvm_component parent);
super.new(name, parent);
trans_collected = new();
item_collected_port = new("item_collected_port", this);
endfunction : new
function void build_phase(uvm_phase phase);
super.build_phase(phase);
if(!uvm_config_db#(virtual mem_if)::get(this, "", "vif", vif))
`uvm_fatal("NOVIF",{"virtual interface must be set for: ",get_full_name(),".vif"});
endfunction: build_phase
// run phase
virtual task run_phase(uvm_phase phase);
item_collected_port.write(trans_collected);
endtask : run_phase
endclass : mem_monitor
Monitor class example
25.
Agent
• a user-definedagent is extended from uvm_agent, uvm_agent is inherited by uvm_component
• An agent typically contains a driver, a sequencer, and a monitor
• Agents can be configured either active or passive
Active agent
• Active agents generate stimulus and drive to DUT
• An active agent shall consists of all the three components driver, sequencer, and monitor
Passive agent
• Passive agents sample DUT signals but do not drive them
A passive agent consists of only the monitor
• An agent can be configured as ACTIVE/PASSIVE by using a set config method, the default agent will be
ACTIVE. the set config can be done in the env or test.
// connect_phase
function void connect_phase(uvm_phase phase);
if(get_is_active() == UVM_ACTIVE) begin
driver.seq_item_port.connect(sequencer.seq_item_export);
end
endfunction : connect_phase
26.
class mem_agent extendsuvm_agent;
//declaring agent components
mem_driver driver;
mem_sequencer sequencer;
mem_monitor monitor;
// UVM automation macros for general components
`uvm_component_utils(mem_agent)
// constructor
function new (string name, uvm_component parent);
super.new(name, parent);
endfunction : new
// build_phase
function void build_phase(uvm_phase phase);
super.build_phase(phase);
if(get_is_active() == UVM_ACTIVE) begin
driver = mem_driver::type_id::create("driver", this);
sequencer = mem_sequencer::type_id::create("sequencer", this);
end
monitor = mem_monitor::type_id::create("monitor", this);
endfunction : build_phase
// connect_phase
function void connect_phase(uvm_phase phase);
if(get_is_active() == UVM_ACTIVE) begin
driver.seq_item_port.connect(sequencer.seq_item_export);
end
endfunction : connect_phase
endclass : mem_agent
Agent with example
27.
Scoreboard
• The user-definedscoreboard is extended from uvm_scoreboard, uvm_scoreboard is inherited by
uvm_component.
• the scoreboard will check the correctness of the DUT by comparing the DUT output with the
expected values
• the scoreboard will receive the transactions from the Monitors implemented inside agents
• Monitor and scoreboard will communicate via TLM ports and exports
• Scoreboard shall compare the DUT output values with,
• The golden reference values
• The values Generated from the reference model
Environment
• The user-defined environment is derived from uvm_env, uvm_env is inherited from
uvm_component.
• The environment is the container class, It contains one or more agents, as well as other
components such as the scoreboard, top-level monitor, and checker.
28.
class mem_scoreboard extendsuvm_scoreboard;
`uvm_component_utils(mem_scoreboard)
uvm_analysis_imp#(mem_seq_item, mem_scoreboard) item_collected_export;
// new - constructor
function new (string name, uvm_component parent);
super.new(name, parent);
endfunction : new
function void build_phase(uvm_phase phase);
super.build_phase(phase);
item_collected_export = new("item_collected_export", this);
endfunction: build_phase
// write
virtual function void write(mem_seq_item pkt);
$display("SCB:: Pkt recived");
pkt.print();
endfunction : write
endclass : mem_scoreboard
Scoreboard with example
29.
class mem_model_env extendsuvm_env;
mem_agent mem_agnt;
`uvm_component_utils(mem_model_env)
// new - constructor
function new(string name, uvm_component parent);
super.new(name, parent);
endfunction : new
// build_phase
function void build_phase(uvm_phase phase);
super.build_phase(phase);
mem_agnt = mem_agent::type_id::create("mem_agnt", this);
endfunction : build_phase
endclass : mem_model_env
Environment class example
30.
Test
• The user-definedtest is derived from uvm_test, uvm_test is inherited from uvm_component.
• The test defines the test scenario for the testbench
• test class contains the environment, configuration properties, class overrides etc
• A sequence/sequences are created and started in the test
• The UVM testbench is activated when the run_test() method is called, the global run_test() task
should be specified inside an initial block.
• There can be many user-defined test cases.Among multiple test cases, a particular test case can be
selected and execute on two methods,
1. by specifying the test name as an argument to run_test();
example: run_test("mem_model_test");
2. by providing the UVM_TESTNAME command line argument
example: <SIMULATION_COMMANDS> +UVM_TESTNAME=mem_model_test
initial begin
run_test();
end
31.
class mem_model_test extendsuvm_test;
`uvm_component_utils(mem_model_test)
mem_model_env env;
mem_sequence seq;
function new(string name = "mem_model_test",uvm_component parent=null);
super.new(name,parent);
endfunction : new
virtual function void build_phase(uvm_phase phase);
super.build_phase(phase);
env = mem_model_env::type_id::create("env", this);
seq = mem_sequence::type_id::create("seq");
endfunction : build_phase
task run_phase(uvm_phase phase);
seq.start(env.mem_agnt.sequencer);
endtask : run_phase
endclass : mem_model_test
Test class example
32.
Top
TestBench top isthe module, it connects the DUT and Verification environment
components.
Typical Testbench_top contains,
• DUT instance
• interface instance
• run_test() method
• virtual interface set config_db
• clock and reset generation logic
• wave dump logic
33.
module tbench_top;
//clock andreset signal declaration
bit clk;
bit reset;
//clock generation
always #5 clk = ~clk;
//reset Generation
initial begin
reset = 1;
#5 reset =0;
end
//creatinng instance of interface, inorder to connect DUT and testcase
mem_if intf(clk,reset);
//DUT instance, interface signals are connected to the DUT ports
memory DUT (
.clk(intf.clk),
.reset(intf.reset),
.addr(intf.addr),
.wr_en(intf.wr_en),
.rd_en(intf.rd_en),
.wdata(intf.wdata),
.rdata(intf.rdata) );
//enabling the wave dump
initial begin
uvm_config_db#(virtual mem_if)::set(uvm_root::get(),"*","mem_intf",intf);
end
initial begin
run_test();
end
endmodule
Top_module example
34.
uvm_component
• Quasi StaticEntity (after build phase
it is available throughout the
simulation)
• Always tied to a given hardware(DUT
Interface) Or a TLM port
• Having phasing mechanism for
control the behavior of simulation
• uvm_component have two arguments,
a name and a uvm_component
parent.
• Components are instantiated at start
of simulation
uvm_object
• Dynamic Entity (create when needed,
transfer from one component to
other & then dereference)
• Not tied to a given hardware or any
TLM port
• No phasing mechanism
• uvm_object have one arguments i.e
name
• Objects are instantiated at run time
Difference between uvm_component and uvm_object
Phases
• Depending ofthe testbench architecture, there will be several components and there needs to be
some ordered way of constructing these as well as executing
• Phases are not used in objects because objects wont present throughout the simulation, they just
created when they needed.
• Each components goes through predefined set of phases and it cannot proceed to the next phase
until all components finish their execution in current phase
• Phases are represented by callback methods, A set of predefined phases and corresponding
callbacks are provided in uvm_component. The Method can be either a function or task.
• Any class deriving from uvm_component may implement any or all of these callbacks, which
are executed in a particular order
• So, uvm phases acts as a synchronizing mechanism in the life cycle of simulation
• All phases can be grouped into 3 categories
1.Build_phase 2. Run-time phase 3.Clean-up phase
Build_phase
• Build_phase areexecuted at start of simulation
• Purpose is to construct the testbench components
• All build_phase methods are functions, therefore execute in zero-simulation time
• Build_phase is top-down approach
Connect_phase
• Used to make TLM connections between components
• It has to occur after build_phase
• It works from bottom to up in testbench component hierarchy
Virtual function void build_phase(uvm_phase
phase);
super.build_phase(phase);
endfunction
Virtual function void connect_phase(uvm_phase phase);
super.build_phase(phase);
driv.seq_item_port.connect(seqr.seq_item_export)
endfunction
41.
end_of_elaboration
• Used tomake any final adjustments to tb connectivity, tb configuration before simulation starts
• Used to display environment hierarchy
• This phase executes from bottom_up
2.Run_Phase
• The UVM Testbench stimulus is generated and executed during the run time phases which
follows the build phases.
• Run phase was present in OVM as well but additional other phases were added to UVM to give
finer run-time for tests, scoreboard and other components.
virtual function void end_of_elaboration_phase(uvm_phase
phase);
uvm_top.print_topology();
uvm_report_info(get_full_name(),”end_of_elaboration”,uvm_LO
W);
endfunction
task run_phase(uvm_phase phase);
::::::::::
endtask
42.
start_of_simulation
• It isa function which occurs before the time consuming part of the testbench begins.
• It is intended to be used for displaying banners; Testbench topology; or configuration
information. It is called in bottom up order.
run_Phase:
• The run phase occurs after the start_of_simulation phase and is used for the stimulus generation
and checking activities of the Testbench.
• The run phase is implemented as a task, and all uvm_component run tasks are executed
in parallel.
• Transactors such as driver and monitor will nearly always use this phase.
virtual function void start_of_simulation phase(uvm_phase
phase);
uvm_report_info(get_full_name(),”start_of_simulation”,uvm_LO
W);
endfunction
task run_phase(uvm_phase phase);
::::::::::
endtask
43.
pre_reset:
• pre_reset phasestarts at the same time as the run phase.
• Its purpose is to take care of any activity that should occur before the reset.
• E.g. waiting for a power signal to go active.
reset:
• Specially for DUT or Interface specific reset behavior.
• This phase would be used to generate reset to put the DUT/Interface into a default state.
post_reset:
• This phase is intended for any activity required just after the reset phase.
task reset_phase(uvm_phase phase);
::::::::::
endtask
task pre_reset_phase(uvm_phase
phase);
::::::::::
endtask
task post_reset_phase(uvm_phase
phase);
::::::::::
endtask
44.
pre_configure:
• This phaseis intended for anything that is required to prepare for the DUT configuration
process after the DUT is out of reset.
configure:
• configure phase is used to put the DUT into a known state before the stimulus could be applied
to the DUT.
• For example – programming the control registers of the device for a particular test scenario.
post_configure:
• This phase is intended to wait for the effect of the configuration to propagate through the DUT.
task configure_phase(uvm_phase
phase);
::::::::::
endtask
task pre_configure_phase(uvm_phase
phase);
::::::::::
endtask
task post_configure_phase(uvm_phase
phase);
::::::::::
endtask
45.
pre_main:
• pre_main isused to ensure that all the components needed to generate the stimulus are ready to
do so.
main:
• main phase is where the stimulus specified by the Test case is generated and applied to the
DUT. It completes in two conditions: One is the stimulus gets exhausted and another is when
timeout occurs. Sequences are started in this phase to generate the stimulus.
post_main:
• Used for any final act after the main phase.
task main_phase(uvm_phase phase);
::::::::::
endtask
task pre_main_phase(uvm_phase phase);
::::::::::
endtask
task post_main_phase(uvm_phase phase);
::::::::::
endtask
46.
pre_shutdown:
• This phaseis acts like a buffer to apply any stimulus before the shutdown phase starts.
shutdown:
• The shutdown phase is to ensure that the effects of stimulus generated during the main phase
has propagated through the DUT and that the resultant data has drained away.
• It might also be used to execute the time consuming sequences that read status registers.
post_shutdown:
• post_shutdown is intended for any final activity before exiting the run phase. After it UVM
Testbench starts the cleanup phase.
task shutdown_phase(uvm_phase
phase);
::::::::::
endtask
task pre_shutdown_phase(uvm_phase
phase);
::::::::::
endtask
task post_shutdown_phase(uvm_phase
phase);
::::::::::
endtask
47.
Clean up Phase:
•The clean up phases are used to extract information from Scoreboards and Functional
Coverage Monitors to determine whether the test case has passed and/or reached its coverage
goals immediately it will be cleaned the stimulus, it will give space for another stimulus
• The clean up phases are implemented as functions and therefore take zero time to execute.
• They work from the bottom to the top of the component hierarchy.
extract:
• The extract phase is used to retrieve and process information from Scoreboards and Functional
Coverage Monitors.
• This may include the calculation of statistical information used by the report phase.
• This phase is usually used by Analysis side components.
48.
check:
• This phaseis also used by the Analysis Components.
• This phase is used to check if the DUT behaved correctly and to find any error that
may have occurred during the stimulus execution.
report:
• The report phase is used to display the results of the simulation to the standard output
or to write the results to file.
• This phase is usually used by Analysis Components.
final:
• The final phase is used to complete any other outstanding actions that the Testbench
has not already completed.
49.
How UVM Phasingis triggered?
• To start a UVM Testbench, the run_test() method has to be called from the static part of the
Testbench.
• It is usually called from within an initial block in the top level module of the Testbench.
• Once the run_test() method is called, it constructs the root componentof the UVM environment
& then triggers/initiates the UVM Phasing process.
• A phase starts only when all components in the previous phase have dropped their objections.
• A phase continues to execute until all components have dropped their objections in the current
phase
// Top level Testbench module
module top_tb; .... .... // UVM start up:
initial begin
uvm_config_db #(virtual bus_if)::set(null, "*", "BUS_vif" ,
BUS);
run_test("bidirect_bus_test");
end endmodule: top_tb
50.
• The run_test()method can be passed with a string argument, which in the above code
is “bidirect_bus_test”, to define the default type name which is used as the root node of
the Testbench Hierarchy.
• In addition, run_test() method also checks for a command line plusarg
called UVM_TESTNAME and uses that plusarg string to lookup a factory registered
uvm_component to override any default type name.
• Hence to execute the “bidirect_bus_test” using command line plusarg, we’ve to use the
following command line:
• % <simulator executable> +UVM_TESTNAME=bidirect_bus_test
// Top level Testbench module
module top_tb; .... .... // UVM start up:
initial begin
uvm_config_db #(virtual bus_if)::set(null, "*", "BUS_vif" ,
BUS);
run_test("bidirect_bus_test");
end endmodule: top_tb
51.
Which phase takesmore time and why ?
• Run phase takes more time because they are the major phases to consume simulation time.
• The time taken for each test can be different, because all tests have different aspects of
design
Phase Synchronization
• By default all components allow all other components to complete a phase before all
components move to next phase
VIP1
VIP2
VIP3
Reset configure main shutdown
Reset
Reset
configure
configure
main
main
shutdown
shutdown
time
Note:In Phase domain each component phases are independent of another component phase- do not use phase domain
52.
How simulation endsin UVM methodology?
• UVM has a phased execution which consists of a set of build phases, run phases and check
phases.
• The run() phase is where the actual test simulation happens and during this phase every
component can raise an objection in beginning and hold it until it is done with its activity.
• Once all components drops the objection, the run() phase completes and then check() phase of all
components execute and then the test ends.
• This is how a normal simulation ends, but there are also controls on simulation timeouts to
terminate the run() phase if some component hangs due to a bug in design or testbench.
• When the run() phase starts, a parallel timeout timer is also started.
• If the timeout timer reaches one of the specified timeout limits before the run() phase completes,
the run() phase will timeout, an error message will be issued and then all phases post run() will
get executed and test ends after that.
Why we gofor uvm reporting
• Verilog $display doesn’t allow filtering and control of messages.
• Changing the verbosity on the command line doesn’t require that u recompile and re-elaborate
the design to observe different trace messages
• If we are using verilog system tasks we need to re-compile the whole RTL again to activate it
which consumes time, energy & resources.
• Uvm reporting services are built into all components and are derived from a parent
uvm_report_object class
• UVM Reporting or Messaging has a rich set of message-display commands & methods to alter
the numbers & types of messages that are displayed without re-compilation of the design.
55.
reporting
• UVM Reportingor Messaging has a rich set of message-display commands & methods to
alter the numbers & types of messages that are displayed without re-compilation of the design.
• UVM Reporting also includes the ability to mask or change the severity of the message to adapt
the required environment condition.
• UVM Reporting has the concepts of Severity, Verbosity and Simulation Handing Behavior.
Each of them can be independently specified and controlled.
• Components are inherited from uvm_report_object, hence components already have methods
and functions to display messages
56.
Concepts of reporting
•Severity
• Severity indicates importance
• Examples are Fatal, Error, Warning & Info
• Verbosity
• Verbosity indicates filter level
• Examples are None, Low, Medium, High, Full & Debug
• Simulation Handling Behavior
• Simulation handling behavior controls simulator behavior
• Examples are Exit, Count, Display, Log, Call Hook & No Action
• Simulation Handling Behavior in-fact is the Action taken by the Simulator which is
dependent on Severity being produced by the Verification Environment. We’ll see
more details shortly about it.
57.
Reporting methods
• Fourbasic reporting functions that can be used with different verbosity levels
• id -- a unique id to form a group of messages.
• message -- The message text
• verbosity -- the verbosity of the message, indicating its relative importance. If this number is
less than or equal to the effective verbosity level, then the report is issued, subject to the
configured action and file descriptor settings.
• filename/line -- If required to print filename and line number from where the message is
issued, use macros, `__FILE__ and `__LINE__.
virtual function void uvm_report_info
(string id,string message,int verbosity=UVM_MEDIUM,string filename="",int line=0)
virtual function void uvm_report_warning
(string id,string message,int verbosity=UVM_MEDIUM,string filename="",int line=0)
virtual function void uvm_report_error(string id,string message,int verbosity=UVM_LOW, string filename="",int lin
e=0)
virtual function void uvm_report_fatal (string id,string message,int verbosity=UVM_NONE, string filename="",int li
ne=0)
58.
Reporting method examples
•Four basic reporting functions that can be used with different verbosity levels
• UVM has six levels of verbosity with each one represented by an integer.
• UVM verbosity level is required only for uvm_info, cant be used for uvm_warning,
uvm_error, uvm_fatal
uvm_report_info (string id,string message,int verbosity=UVM_MEDIUM,string filename="",int line=
0)
uvm_report_warning (string id,string message,int verbosity=UVM_MEDIUM,string filename="",int l
ine=0)
uvm_report_error (string id,string message,int verbosity=UVM_LOW, string filename="",int line=0)
uvm_report_fatal (string id,string message,int verbosity=UVM_NONE, string filename="",int line=0)
uvm_report_info (get_type_name (), $sformatf ("None level message"), UVM_NONE);
uvm_report_info (get_type_name (), $sformatf ("Low level message"), UVM_LOW);
uvm_report_info (get_type_name (), $sformatf ("Medium level message"),
UVM_MEDIUM);
uvm_report_info (get_type_name (), $sformatf ("High level message"), UVM_HIGH);
uvm_report_info (get_type_name (), $sformatf ("Full level message"), UVM_FULL);
uvm_report_info (get_type_name (), $sformatf ("Debug level message"),
UVM_DEBUG);
uvm_report_warning (get_type_name (), $sformatf ("Warning level message"));
uvm_report_error (get_type_name (), $sformatf ("Error level message"));
uvm_report_fatal (get_type_name (), $sformatf ("Fatal level message"));
59.
uvm_actions
• uvm_action areused to control the simulation behavior
• These methods associate the specified action or actions with reports of the given severity, id,
or severity-id pair.
• Following are the actions defined:
UVM_NO_ACTION -- Do nothing
UVM_DISPLAY -- Display report to standard output
UVM_LOG -- Write to a file
UVM_COUNT -- Count up to a max_quit_count value before exiting
UVM_EXIT -- Terminates simulation immediately
UVM_CALL_HOOK -- Callback the hook method .
60.
Messages Verbosity:
• Fundamentallythe Verbosity level describes how verbose a Testbench can be.
• The default Verbosity is UVM_MEDIUM.
• There are different Verbosity level being supported by UVM.
• In case of default Verbosity level i.e. UVM_MEDIUM, any messages with UVM_HIGH or
above are filtered out.
UVM_NONE 0
UVM_LOW 100
UVM_MEDIUM
(Default)
200
UVM_HIGH 300
UVM_FULL 400
UVM_DEBUG 500
Highest priority messages UVM_NONE
lowest priority messages UVM_DEBUG
61.
How to changeverbosity settings
• Verbosity settings can be modify by using command line switches and method calls
1. Changing verbosity using Cmd_line switch
• The advantage of cmd_line switches is that if the design has been compiled into a simulation
executable
• The design can be re-simulated using a different verbosity setting without recompiling the
design and testbench
• The most common option is cmd_line switch +UVM_VERBOSITY= <verbosity>
• Where <verbosity> can be anyone of the following UVM_NONE, UVM_LOW,
UVM_MEDIUM, UVM_HIGH, UVM_DEBUG
• Changing the verbosity for specific component using cmd_line option
+uvm_set_verbosity=<comp>,<id>,<verbosity>,<phase>
62.
• Change theverbosity to UVM_LOW for all components in the agent
simv +UVM_TESTNAME=test1
+uvm_set_verbosity=uvm_test_top.e.agnt.*,_ALL_,UVM_LOW,run
Changing verbosity using method calls
• Using verbosity method calls that selectively change verbosity settings for specific components or
for entire component hierarchy
• function void set_report_verbosity_level (int verbosity_level)
function void set_report_severity_action (uvm_severity severity,uvm_action action)
function void set_report_id_action (string id,uvm_action action)
function void set_report_severity_id_action (uvm_severity severity,string id,uvm_action action)
63.
Using get_type_name, get_full_name,get_name
• There are three built in methods which is used to call inside the reporting macros
• They are get_name(), get_type_name(), get_full_name()
• get_name(): returns the name of the object
`uvm_error(get_name(), “driver“) // :drv [D] driver
• get_full_name(): returns the full hierarchical name of this object
`uvm_error(get_full_name(), “driver“) // :top.test.env.agent1.drv[DRV]driver
• get_type_name(): returns the type name of the object
`uvm_error(get_type_name(), “driver“) // :drv [DRV]driver
Configuration database
• Configdb allows passing of objects and data to various components in the testbench.
• It is built on top of the UVM resource database, uvm_resource_db
• uvm_resource_db is a data sharing mechanism where hierarchy is not important.
• The database is essentially a lookup table which uses a string as a key and where you can add
and retrieve entries.
• resource database makes use of type-parameterized classes.
• This means that T in the class header must be replaced by the actual type of the resource you
want to work with.
• Each type of resource, therefore, gets its own specialized class.
class uvm_resource_db#(type T=uvm_object)
66.
Continu,,
• The uvm_config_dbclass is the recommended way to access the resource database.
• A resource is any piece of information that is shared between more than one component or object.
• We use uvm_config_db::set to put something into the database and uvm_config_db::get to
retrieve information from the database.
• The uvm_config_db class is parameterized, so the database behaves as if it is partitioned into
many type-specific "mini databases."
• There are no limitations on the the type - it could be a class, a uvm_object, a built in type such as
a bit, byte, or a virtual interface.
• There are two typical uses for uvm_config_db.
• The first is to pass virtual interfaces from the DUT to the test, and the second is to pass
configuration classes down through the testbench.
67.
Functions in resource_db
•There are several common functions of the uvm_resource_db class that allow you to add or
retrieve data.
Methods Description
get_by_type This function gets the resource by the type specified by the parameter so the only argument is the
scope.
get_by_name This function gets a resource by using both the scope and name given when it was added to the
database.
set This function creates a new resource in the database with a value, scope, and name that will be
used for retrieval.
read_by_name This function locates a resource by scope and name and returns the value through an output
argument.
read_by_type This function locates the resource using only the scope as a lookup and returns the value through
an output argument.
write_by_name This function locates the resource by scope and name and writes the value to it. If the resource
does not exist then it will be created like the set function.
write_by_type This function locates the resource by the scope and writes the value to it. If the resource does not
exist it is created.
68.
WHEN IS THECONFIGURATION DATABASE USED?
• The uvm_config_db is used when hierarchy is important.
• With the uvm_config_db, the user not only can add an object to the database, but can also specify, with
great detail, the level of access to retrieval by specifying the hierarchy
• The classic example of uvm_config_db usage is with sharing a virtual interface.
• A SystemVerilog interface is instantiated at the top level of the testbench and connects to the ports of
the device under test (DUT).
• For the UVM testbench to be able to drive to driver or monitor this interface, it needs to have access
to it.
• The various interface instantiations can be added to the database with the access level controlled, since
it can then be retrieved by the appropriate component only if it is in the specified hierarchy.
• Virtual interfaces are not the only use for the configuration database. Any object can be stored and
retrieved.
• Other common uses of the configuration database include sharing configuration objects or setting
whether an agent is active or passive.
69.
HOW IS DATASTORED AND RETRIEVED?
• configdatabase, there are only two functions that are most commonly used with the configuration
database:
• • set – adds an object to the uvm_config_db
• • get – retrieves an object from the uvm_config_db
• Note that all the methods of the uvm_config_db class are static so they must be called with the scope
resolution operator, as is the case with the uvm_resource_db.
• Once again, type parameterization is used so the actual type for the resource, T, must be given.
• Also noteworthy, the default parameter type of the uvm_resource_db is uvm_object, whereas the
default type for the uvm_config_db is int
class uvm_config_db#(type T=int) extends uvm_resource_db#(T)
70.
Contin……
• set() functionhas four arguments
• The get() function which is used to retrieve items from the database.
• It is important to note that objects are not removed from the database when you call get().
• The actual variable is passed in as an inout formal function argument and so is performed as a
copy-in-copy-out operation.
Static function void set(uvm_component cntxt, string inst_name, string field_name, Tvalue)
cntxt: The context is the hierarchical starting point of where the database entry is accessible.
string inst_name:The instance name is the hierarchical path that limits accessibility of the
database entry.
String field_name:The field name is the label used as a lookup for the database entry.
Tvalue: The value to be stored in the database of the parameterized type. By default the type is int.
Static function void get(uvm_component cntxt, string inst_name, string field_name,
inoutTvalue)
cntxt:The context (cntxt) is the starting point for the search.
string inst_name: The instance name in this case can be an empty string since it is relative to the
context
String field_name:The field name is the label given when the object was added to the database
71.
Contin……
• An interfacehas been instantiated in the top level and now needs to be added to the uvm_config_db
using the set()function.
• The most basic way to do this is to use the set() function and allow the virtual interface to be widely
accessible from anywhere within the testbench.
• The first argument is the context (cntxt) which is the starting point of the lookup search.
• The example uses uvm_root::get() to acquire the top-level so the search will start at the top of the
hierarchy in this case.
• Normally "this" would be used as the context if the call to set() is within a class, but to set the virtual
interface correctly in the database, the code has to be placed inside a module, so there would be no
class context.
• The second argument is the instance name. In this example, the interface is being made globally
available amongst all components so the wildcard, "*", is used.
• The third argument is the field name which is a label used for lookup.
• Finally, the value argument is the actual instance of the interface.
uvm_config_db#(virtual tb_intf)::set(uvm_root::get(),"*",
"dut_intf", vif
72.
Contin……
• In mostcases, you do not want to make a database entry globally available.
• Since a global scope is essentially a single namespace, it makes reuse more difficult if everything is
stored in this scope.
• To restrict its access, use the hierarchical path in conjunction with the wildcard character as shown
below
• Adding other objects into the uvm_config_db is just as straightforward as adding a virtual interface
• The important thing to remember is that each entry needs a unique field name or label (if the global
scope is being used), or the path needs to be limited in such a way that non-unique labels do not
conflict as the scopes are now limited to specific areas of the naming hierarchy
uvm_config_db#(TYPE)::set(this,"*.path","label",
value)
73.
Contin……
• uvm_config_db: avirtual interface, an integer value, and a configuration object. Also, there is
a generic call to the get() function.
• To retrieve the integer value the label would be "retry_count" and the value stored in this
entry would be assigned to the rty_cnt property in the object that is calling the get() function.
set()
• Static functionof the class uvm_Config_db to set a variable in the configuration database
static function void set ( uvm_component cntxt, string inst_name, string field_name, T
value);
virtual function void build_phase (uvm_phase phase);
... uvm_config_db #(int) :: set (null, "uvm_test_top.m_env.m_apb_agent", "cov_enable", 1); ... endfunction
// Set virtual interface handle under name "apb_vif" available to all components below uvm_test_top,
indicated by the *
uvm_config_db #(virtual apb_if) :: set (null, "uvm_test_top.*", "apb_vif", apb_if);
// Set an int variable to turn on coverage collection for all components under m_apb_agent
uvm_config_db #(int) :: set (null, "uvm_test_top.m_env.m_apb_agent.*", "cov_enable", 1);
// Consider you are in agent's build_phase then you may achieve the same effect by
uvm_config_db #(int) :: set (this, "*", "cov_enable", 1);
76.
• Static functionof the class uvm_Config_db to set a variable in the configuration database
static function bit get ( uvm_component cntxt, string inst_name, string field_name, T
value);
// Get virtual interface handle under name "apb_vif" into local virtual interface handle at m_env level
uvm_config_db #(virtual apb_if) :: get (this, "*", "apb_vif", apb_if);
// Get int variable fails because no int variable found in given scope uvm_config_db #(int) :: get (null,
"uvm_test_top", "cov_enable", cov_var);
get()
static function bit exists ( uvm_component cntxt, string inst_name, string field_name, bit
spell_chk);
exists()
// Check if interface handle exists at the given scope
if (! uvm_config_db #(virtual apb_if) :: exists (this, "*", "apb_vif"))
`uvm_error ("VIF", "Could not find an interface handle",
UVM_MEDIUM)
77.
Convenience tasks
static taskwait_modified ( uvm_component cntxt, string inst_name, string field_name);
class my_agent extends uvm_agent;
virtual task run_phase (uvm_phase phase); ... // Waits until loopCount variable gets a new
value uvm_config_db #(int) :: wait_modified (this, "", "loopCount");
endtask endclass
class my_env extends uvm_env; my_agent m_apb_agent;
virtual task main_phase (uvm_phase phase);
... // Update loopCount variable in database
for (int i = 0; i < N; i++) begin ... uvm_config_db #(int) :: set (this, "m_apb_agent", "loopCount", i);
end
endtask endclass
wait_modified()
typedef uvm_config_db #(uvm_bitstream_t) uvm_config_int; typedef
uvm_config_db #( string) uvm_config_string; typedef uvm_config_db
#(uvm_object) uvm_config_object; typedef uvm_config_db
#(uvm_object_wrappet) uvm_config_wrapper;
Introduction
• As perthe recommended UVM methodology, we should never construct new components
and/or transactions using new() class constructor.
• Instead, it is recommended that – we should make calls to a look-up table to create the requested
components and transactions.
• This special look-up table is called “Factory” in UVM. Entries to this look-up table are made
by registering the components and/or transactions while defining them.
• To create a component/transaction using Factory, create() method is used.
• The purpose of factory in UVM is to change the behaviour of the testbench without any
change in code or without any compilation.
• Basically it's for overriding purpose where you can override any object/component or class
into the another without any further modification.
80.
Contin…
• UVM Factoryfacilitates an object of one type to be substituted with an object of derived type
without having to change the structure of the Testbench or modify the Testbench code.
• This behavior is called “overriding” and there are following types of overriding is possible
with UVM Factory
1. Type Overriding(set_type_override or Global override)
2. Instance Overriding(set_inst_override)
• Overriding helps to replace one transaction/sequence with another to generate new scenarios or
conditions without making any change in the Testbench structure/code.
• Similarly, a new version of the components can be brought into the Testbench without any
change in the structure of the Testbench & beauty of all this is that – it happens all the fly at the
run time.
81.
• Registering uvm_objectwith factory
`uvm_object_utils(sequence)
• Using create() to instantiate objects
• <type>::type_id::create(“<name>”);
seq=sequence::type_id::create(“seq”);
this keyword not used for objects, objects
doesn’t have any hierarchy
• Registering uvm_component with factory
`uvm_component_utils(monitor)
• Using create() to instantiate components
• <type>::type_id::create(“<name>”, <parent>);
mon=monitor::type_id::create(“mon”, this);
• this keyword is required, because testbench
component have a hierarchy
• this keyword represents parent
Factory registrations for object and component
82.
Why do weneed factory?
• Consider a case in which you have a agent and driver, monitor are instantiated inside the agent.
• Now you want to change the base driver with the extended driver, you can the extend the base
driver and create a new driver class.
• Now to use this extended driver class you need to change the code in the agent class also
• e.g new instantiation of the extended driver class, if not then again you need to extend the agent
class and use extended driver class, which is too much of overhead
• To avoid this we use factory. In factory by registering the driver class we can now override the
base driver with extended driver without changing the code in the agent class.
83.
Components/objects creating usingnew()
calling the new() is not recommended and limits reuse
Class driver extends uvm_component;
`uvm_component_utils(driver)
function new(string name, uvm_component parent);
super.new(name,parent);
endfunction
::::::
virtual task driver_transfer();
::::::
endclass
Class agent extends uvm_component;
`uvm_component_utils(agent)
driver my_drv;
function new(string name, uvm_component parent);
super.new(name,parent);
my_drv=new(“my_drv”, this);
endfunction
::::::
virtual task driver_transfer();
::::::
endclass
Suppose user wants to add extra data or trying to override the
driver task using new()
Class my_project extends driver;
`uvm_component_utils(my_project)
function new(string name, uvm_component
parent);
super.new(name,parent);
endfunction
::::::
virtual task driver_transfer();
Super.drive_transfer();
::::::
endclass
• Agent instantiates previous driver not the my_project driver
• To add this m_project driver in agent need to extend the
agent class & potentially other clases need to instantiate dis
driver
• Sine driver, agent clases need to be extended dis makes
code modification all over the testbench
• Uvm factory introduces overriding option by using factory concept overriding the exact
driver from outside the agent instead of using new(), user needs to use create()
• The main difference between new() and create() is, by using create we can overriding the
code without any modification ,but by using new() its not possible
84.
Components/objects creating usingcreate()
calling the create()
Class driver extends uvm_component;
`uvm_component_utils(driver)
function new(string name, uvm_component
parent);
super.new(name,parent);
endfunction
:::::virtual task driver_transfer():
endclass
Class agent extends uvm_component;
`uvm_component_utils(agent)
driver my_drv;
function new(string name, uvm_component
parent);
super.new(name,parent);
my_drv=new(“my_drv”, this);
endfunction
::::::
virtual task driver_transfer();
::::::
endclass
• We will register the components & objects using type_id and while creating the instances of
components or objects we will create them by the factory method “create” which is called
using type_id
• type_id of driver is overridden with child_driver type_id, inside agent create method is called with child_driver type_id hence the
instance of child_driver is created.
• With the help of the factory, we can override the type of underlying components or objects from the top-level component without having
to edit the code.
class test extends uvm_test;
....
function void build_phase(uvm_phase phase);
....
// calling factory overriding method to override the type_id of driver with child_driver
type_id
set_type_override_by_type(driver::get_type(),child_driver::get_type());
endfunction
Class child_driver extends driver;
`uvm_component_utils(child_driver)
function new(string name, uvm_component
parent);
super.new(name,parent);
endfunction
::::::
virtual task driver_transfer();
Super.drive_transfer();
::::::
Endclass
The code inside the agent, the
driver instance will be created as
the create method is called with
type_id of driver
later in one test case suppose we
need to override this particular
driver with child_driver, we can
override it from top-level
component (test) using the factory
as shown below.
85.
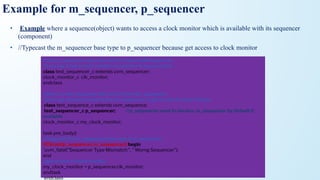
Example for factoryreuse
• Consider a case when you are moving from one project to another.
• For example, USB 2.0 to USB 3.0. You understand that you leverage everything from USB 2.0
testbench and use it as USB 3.0 testbench with exception of driver.
• It will so much of a pain to replace each instance of driver class.
• Now, this is where factory comes to your rescue.
• When you override the old driver class with the new driver class using factory method
set_type_override, all instances of old driver class will be replaced by the new instance of USB3.0
driver class.
Type Overriding:
• Intype-override, overriding the current class type(original class) with other class type(derived class
or substitute_type)
• where “replace” is a bit which is when set equals to 1, enables the overriding of an existing
override else existing override is honoured.
<original_type>::type_id::set_type_override(<substitute_type>::get_type(),
replace);
class my_test extends uvm_test;
`uvm_component_utils(my_test) env e;
function new (string name, uvm_component parent);
super.new(name, parent);
endfunction: new
function void build_phase(uvm_phase phase);
super.build_phase(phase);
my_driver::type_id::set_type_override(my_updated_driver::get_typ
e(),1); (or)
//set_type_overidde_by_type(my_driver::get_type(),my_updated_d
river());
e = env::type_id::create("e", this);
endfunction: build_phase
task run_phase (uvm_phase phase); ... ... ...
endtask: run_phase
endclass: my_test
//Overriding
my_driver class with
my_updated_driver
• Note here is the order of 2 commands
i.e. set_type_override() to be placed
before the create() command inside the
build_phase() of the my_test class.
• Only with this order of commands the
substitution will get into effect.
• In case the order is reversed, original
driver in the code i.e. my_driver will be
constructed instead of the intended driver
i.e. my_updated_driver.
88.
Instance override
• InInstance Overriding, as name indicates it substitutes ONLY a particular instance of the
component OR a set of instances with the intended component.
• The instance to be substituted is specified using the UVM component hierarchy.
path should be agent1 * check only below components
path should be agent1* check agent1 and below components
Agent_top
agent1
agent2
drv2 mon2 seqr2
drv1 mon1 seqr1
<original_type>::type_id::set_inst_override(<substitute_type>::get_type(), <path_string>);
89.
Instance Override
class my_testextends uvm_test;
`uvm_component_utils(my_test) env e;
function new (string name, uvm_component parent);
super.new(name, parent);
endfunction: new
function void build_phase(uvm_phase phase);
super.build_phase(phase);
my_driver::type_id::set_inst_override(my_updated_driver::get_type(),
"top.e.agent.drvr");
set_inst_overidde_by_type(my_driver::get_type(),my_updated_driver(),”*”)
or
set_inst_overidde_by_type(my_driver::get_type(),my_updated_driver(),”agen
t.*”);
or
set_inst_overidde_by_type(my_driver::get_type(),my_updated_driver(),”agen
t*”);
e = env::type_id::create("e", this);
endfunction: build_phase
task run_phase (uvm_phase phase); ... ... ...
endtask: run_phase
endclass: my_test
• Objects or sequence related
objects are generally only used
with type override
• since the instance override
approach relates to a position
in the UVM Testbench
component hierarchy which
objects do not take part in.
90.
• For complexUVM Testbench Environment, it is often useful to print out the structure of the
testbench in tabular form, that were registered with the Factory.
• A great technique to view the structural composition of the Testbench classes and the Factory
setup is to call the this.print() and factory.print() methods in the end_of_elaboration_phase()
(as shown in Code below) from the top-level testbench.
• By the time the end_of_elaboration_phase() executes, the entire environment has already been
built and connected
• So these print() methods show what had been built in the Testbench and the types that were
registered with the factory.
Debugging the UVM Testbench Structure & Factory Content
function void end_of_elaboration_phase(uvm_phase
phase);
super.end_of_elaboration_phase(phase);
this.print();
factory.print();
endfunction: end_of_elaboration_phase
• They are2 ways to implement important transaction methods
1. First method is using field_macros
2. Second method is using manual coding techniques by overriding build in do_methods
• Using field macros is relatively simple but they can be inefficient during simulation & difficult
to debug if something does go wrong
• Cadence and mentor uvm experts avoid using field macros due to their coding and simulation
inefficiencies
Transaction methods in sequence_item
93.
Utility & fieldmacros example
class ABC extends uvm_object;
rand bit [15:0] m_addr;
rand bit [15:0] m_data;
`uvm_object_utils_begin(ABC)
`uvm_field_int(m_addr, UVM_DEFAULT)
`uvm_field_int(m_data, UVM_DEFAULT)
`uvm_object_utils_end
function new(string name = "ABC");
super.new(name); endfunction
endclass
//field macros are invoked inside the
utility macros
class ABC extends uvm_object;
`uvm_object_utils(ABC)
rand bit [15:0] m_addr;
rand bit [15:0] m_data;
`uvm_field_utils_begin(ABC) // error dis line
`uvm_field_int(m_addr, UVM_DEFAULT)
`uvm_field_int(m_data, UVM_DEFAULT)
`uvm_field_utils_end
function new(string name = "ABC");
super.new(name); endfunction
endclass
Output:Error because uvm_object_utils macro
also calls uvm_field_macros no need to define as
uvm_field_utils_begin, its illegal
94.
Utility macros
• Utilitymacros are used to declare either object or component going to store in factory
• Field_macros are used inside the utility macros
• If we specify begin-end, it wont be block , if it is not blocked then every time we need to change
fields
• Once it blocks by using begin-end, then particular fields will freeze with particular i.e., int, enum
etc
uvm_object_utils_begi
n();
:::::::;
uvm_object_utils_end
begin-end , whatever inside
fields we r going to write
that will be block
uvm_component_utils_be
gin();
:::::::;
uvm_object_utils_end
95.
Utility macros
For simpleobjects with no field macros, use
`uvm_object_utils(TYPE)
For simple objects with field macros, use
`uvm_object_utils_begin(TYPE)
`uvm_field_* macro invocations here
`uvm_object_utils_end
For parameterized objects with no field macros,
use
`uvm_object_param_utils(TYPE)
For parameterized objects, with field macros,
use
`uvm_object_param_utils_begin(TYPE)
`uvm_field_* macro invocations here
`uvm_object_utils_end
For simple objects with no field macros, use
`uvm_component_utils(TYPE)
For simple objects with field macros, use
`uvm_component_utils_begin(TYPE)
`uvm_field_* macro invocations here
`uvm_component_utils_end
For parameterized objects with no field macros,
use
`uvm_component_param_utils(TYPE)
For parameterized objects, with field macros,
use
`uvm_component_param_utils_begin(TYPE)
`uvm_field_* macro invocations here
`uvm_component_utils_end
96.
UVM Field Macros
•The `uvm_field_* macros are invoked inside of the `uvm_*_utils_begin and `uvm_*_utils_end
macro blocks to form “automatic” implementations of the core data methods:
copy, compare, pack, unpack, record, print, and sprint.
• By using the macros, you do not have to implement any of the do_* methods inherited
from uvm_object.
• The field macros expand into general inline code that is not as run-time efficient nor as flexible as
direct implementions of the do_* methods.
• Each `uvm_field_* macro is named according to the particular data type it handles:
integrals, strings, objects, queues, etc., and each has at least two arguments: FIELD and FLAG.
FIELD-int
FLAG-UVM_DEFAULT `uvm_object_utils_begin(ABC)
`uvm_field_int(m_addr, UVM_DEFAULT)
`uvm_field_int(m_data, UVM_DEFAULT)
`uvm_object_utils_end
97.
Field_macros FIELD description
FIELDTYPE Description
`UVM_FIELD_* MACROS Macros that implement data operations for scalar properties.
`uvm_field_int Implements the data operations for any packed integral property.
`uvm_field_object Implements the data operations for an uvm_object-based property.
`uvm_field_string Implements the data operations for a string property.
`uvm_field_enum Implements the data operations for an enumerated property.
`uvm_field_real Implements the data operations for any real property.
`uvm_field_event Implements the data operations for an event property.
• Macros that implement data operations for scalar properties.
98.
Field_macros FIELD description
FIELDTYPE Description
`UVM_FIELD_SARRAY_*
MACROS
Macros that implement data operations for one-dimensional static array
properties.
`uvm_field_sarray_int Implements the data operations for a one-dimensional static array of integrals.
`uvm_field_sarray_object Implements the data operations for a one-dimensional static array of uvm_object-based
objects.
`uvm_field_sarray_string Implements the data operations for a one-dimensional static array of strings.
`uvm_field_sarray_enum Implements the data operations for a one-dimensional static array of enums.
`UVM_FIELD_ARRAY_*
MACROS
Macros that implement data operations for one-dimensional dynamic array
properties.
`uvm_field_array_int Implements the data operations for a one-dimensional dynamic array of integrals.
`uvm_field_array_object Implements the data operations for a one-dimensional dynamic array
of uvm_object-based objects.
`uvm_field_array_string Implements the data operations for a one-dimensional dynamic array of strings.
`uvm_field_array_enum Implements the data operations for a one-dimensional dynamic array of enums.
99.
Field_macros FIELD description
FIELDTYPE Description
`UVM_FIELD_QUEUE_* MACROS Macros that implement data operations for dynamic queues.
`uvm_field_queue_int Implements the data operations for a queue of integrals.
`uvm_field_queue_object Implements the data operations for a queue of uvm_object-based
objects.
`uvm_field_queue_string Implements the data operations for a queue of strings.
`uvm_field_queue_enum Implements the data operations for a one-dimensional queue of enums.
`UVM_FIELD_AA_*_STRING
MACROS
Macros that implement data operations for associative arrays
indexed by string.
`uvm_field_aa_int_string Implements the data operations for an associative array of integrals
indexed by string.
`uvm_field_aa_object_string Implements the data operations for an associative array
of uvm_object-based objects indexed by string.
`uvm_field_aa_string_string Implements the data operations for an associative array of strings
indexed by string
100.
Field_macros FIELD description
FIELDTYPE Description
`UVM_FIELD_AA_*_INT MACROSMacros that implement data operations for associative arrays
indexed by an integral type.
`uvm_field_aa_object_int Implements the data operations for an associative array
of uvm_object-based objects indexed by the int data type.
`uvm_field_aa_int_int Implements the data operations for an associative array of integral types
indexed by the int data type.
`uvm_field_aa_int_int_unsign
ed
Implements the data operations for an associative array of integral types
indexed by the int unsigneddata type.
`uvm_field_aa_int_integer Implements the data operations for an associative array of integral types
indexed by the integer data type.
`uvm_field_aa_int_integer_un
signed
Implements the data operations for an associative array of integral types
indexed by the integer unsigned data type.
101.
Field_macros FIELD description
RECORDINGMACROS The recording macros assist users who implement
the uvm_object::do_record method.
`uvm_record_attribute Vendor-independent macro for recording attributes (fields) to a
vendor-specific transaction database.
`uvm_record_field Macro for recording name-value pairs into a transaction recording
database.
PACKING MACROS The packing macros assist users who implement
the uvm_object::do_packmethod.
PACKING - WITH SIZE INFO
`uvm_pack_intN Pack an integral variable.
`uvm_pack_enumN Pack an integral variable.
`uvm_pack_sarrayN Pack a static array of integrals.
`uvm_pack_arrayN Pack a dynamic array of integrals.
`uvm_pack_queueN Pack a queue of integrals.
102.
Field_macros FIELD description
PACKING- NO SIZE INFO
`uvm_pack_int Pack an integral variable without having to also specify the bit size.
`uvm_pack_enum Pack an enumeration value.
`uvm_pack_string Pack a string variable.
`uvm_pack_real Pack a variable of type real.
`uvm_pack_sarray Pack a static array without having to also specify the bit size of its
elements.
`uvm_pack_array Pack a dynamic array without having to also specify the bit size of its
elements.
`uvm_pack_queue Pack a queue without having to also specify the bit size of its elements.
103.
Field_macros FIELD description
UNPACKING- WITH SIZE INFO
`uvm_unpack_intN Unpack into an integral variable.
`uvm_unpack_enumN Unpack enum of type TYPE into VAR.
`uvm_unpack_sarrayN Unpack a static (fixed) array of integrals.
`uvm_unpack_arrayN Unpack into a dynamic array of integrals.
`uvm_unpack_queueN Unpack into a queue of integrals.
UNPACKING - NO SIZE INFO
`uvm_unpack_int Unpack an integral variable without having to also specify the bit size.
`uvm_unpack_enum Unpack an enumeration value, which requires its type be specified.
`uvm_unpack_string Pack a string variable.
`uvm_unpack_real Unpack a variable of type real.
`uvm_unpack_sarray Unpack a static array without having to also specify the bit size of its
elements.
`uvm_unpack_array Unpack a dynamic array without having to also specify the bit size of
its elements.
`uvm_unpack_queue Unpack a queue without having to also specify the bit size of its
elements.
104.
Field_macros FIELD description
FIELDTYPE Description
`uvm_field_aa_int_byte Implements the data operations for an associative array of integral types
indexed by the byte data type.
`uvm_field_aa_int_byte_unsig
ned
Implements the data operations for an associative array of integral types
indexed by the byte unsigned data type.
`uvm_field_aa_int_shortint Implements the data operations for an associative array of integral types
indexed by the shortint data type.
`uvm_field_aa_int_shortint_un
signed
Implements the data operations for an associative array of integral types
indexed by the shortint unsigned data type.
`uvm_field_aa_int_longint Implements the data operations for an associative array of integral types
indexed by the longint data type.
`uvm_field_aa_int_longint_un
signed
Implements the data operations for an associative array of integral types
indexed by the longint unsigned data type.
`uvm_field_aa_int_key Implements the data operations for an associative array of integral types
indexed by any integral key data type.
`uvm_field_aa_int_enumkey Implements the data operations for an associative array of integral types
indexed by any enumeration key data type.
105.
Field_macros FLAG description
FLAGDescription
UVM_ALL_ON Set all operations on (default)
UVM_DEFAULT Use the default flag settings
UVM_NOCOPY Do not copy this field
UVM_NOCOMPARE Do not compare this field
UVM_NOPRINT Do not print this field
UVM_NODEFPRINT Do not print the field if it is the same as its
UVM_NOPACK Do not pack or unpack this field
UVM_PHYSICAL Treat as a physical field. Use physical setting in policy class for this field
UVM_ABSTRACT
Treat as an abstract field. Use the abstract setting in the policy class for
this field
UVM_READONLY Do not allow the setting of this field from the set_*_local methods
106.
A radix forprinting and recording can be specified by OR’ing one of the following constants in
the FLAG argument
FLAG Description
UVM_BIN Print/record the field in binary (base-2)
UVM_DEC Print/record the field in decimal (base-10)
UVM_UNSIGNE
D
Print/record the field in unsigned decimal
(base-10)
UVM_OCT Print/record the field in octal (base-8).
UVM_HEX Print/record the field in hexadecimal (base-16)
UVM_STRING Print/record the field in string format
UVM_TIME Print/record the field in time format
107.
• Using field_automation_macrosare not recommended these days, because it introduce a lot of
additional code and reduces simulation performance
• It is recommended to use do_macros, user can implement the functions called do_print,
do_record, do_compare, do_pack, do_unpack
• They are 6 do_macros in sequence_item
1. do_print
2. do_record
3. do_copy
4. do_compare
5. do_pack
6. do_unpack
7. clone
8. create
do_methods in sequence_item
do_methods in sequence_item
printvirtual function void do_print(uvm_printer printer);
super.do_print(printer);
printer.print_string("m_bool", m_bool.name());
printer.print_field_int("m_mode", m_mode, $bits(m_mode), UVM_HEX);
printer.print_string("m_name", m_name);
endfunction
sprint `uvm_info(get_type_name(), $sformatf("Contents: %s", obj.sprint()), UVM_LOW)
convert2string virtual function string convert2string();
string contents = ""; $sformat(contents, "%s m_name=%s", contents, m_name);
$sformat(contents, "%s m_bool=%s", contents, m_bool.name());
$sformat(contents, "%s m_mode=0x%0h", contents, m_mode);
foreach(m_data[i])
Begin
$sformat(contents, "%s m_data[%0d]=0x%0h", contents, i, m_data[i]);
end
return contents;
110.
do_methods in sequence_item
Copy// Implementation of "do_copy". A generic uvm_object called "rhs“
// is received and type casted into Packet called "_pkt". Then
// m_addr is copied from _pkt to the variable in current
class virtual function void do_copy(uvm_object rhs);
Packet _pkt; super.do_copy(rhs);
$cast(_pkt, rhs); m_addr = _pkt.m_addr;
`uvm_info(get_name(), "In Packet::do_copy()", UVM_LOW)
endfunction
Compare function void _compare(Object obj1, obj2);
if (obj2.compare(obj1))
`uvm_info("TEST", "obj1 and obj2 are same", UVM_LOW)
else
`uvm_info("TEST", "obj1 and obj2 are different", UVM_LOW)
endfunction
pack virtual function void do_pack(uvm_packer packer);
super.do_pack(packer);
packer.pack_field_int(m_addr, $bits(m_addr));
packer.pack_field_int(m_wdata, $bits(m_wdata));
packer.pack_field_int(m_rdata, $bits(m_rdata));
packer.pack_field_int(m_wr, $bits(m_wr));
Endfunction
111.
do_methods in sequence_item
unpack// Now unpack the packed int array into the second object, and display
m_val3 = m_pkt2.unpack_ints(m_ints);
`uvm_info(get_type_name(), $sformatf("unpacked m_val3=0x%0h", m_val3),
UVM_LOW)
m_pkt2.print();
clone function void build_phase(uvm_phase phase);
// Create obj1, but only declare handle for obj2
Object obj2;
Object obj1 = Object::type_id::create("obj1");
obj1.randomize();
`uvm_info("TEST", $sformatf("Obj1.print: %s", obj1.convert2string()), UVM_LOW)
// Use $cast to clone obj1 into obj2
$cast(obj2, obj1.clone());
`uvm_info("TEST", "After clone", UVM_LOW)
`uvm_info("TEST", $sformatf("Obj2.print: %s", obj2.convert2string()), UVM_LOW)
endfunction
Writing sequence usingdo_macros
• We know that sequence calls the start_item and finish_item inside the task body
• Instead of writing all these statements in code by simply calling uvm_sequence macros
• At compile time these macros will be substituted , with calls to start_item() and
finish_item()
• uvm_do_macros are used to reduce the no. of lines in code by creating item,
randomizing it and automatically calling the required tasks to start given sequence or
sequence_item
114.
uvm sequence macros
MacroDescription
`uvm_do(Item/Seq)
This macro takes seq_item or sequence as argument.
On calling `uvm_do() the above-defined 6 steps will be
executed.
`uvm_create(Item/Seq) This macro creates the item or sequence.
`uvm_send(Item/Seq)
create() and randomize() are skipped, rest all other
steps are executed.
`uvm_rand_send(Item/Seq)
Only create() is skipped, rest all other steps are
executed.
`uvm_do_with(Item/Seq,Constraints)
This macro performs above 6 steps along with
constraints defined in second argument.
`uvm_rand_send_with(Item/Seq,Constraints)
create() is skipped, rest all other steps are executed
along with constraints defined in second argument.
`uvm_do_pri(Item/Seq,Priority ) Performs `uvm_do() with priority mentioned.
1.create_item() / create req 2.wait_for_grant() 3.randomize the req 4.send the req
5.wait for item done 6.get response.
115.
uvm sequence macros
MacroDescription
`uvm_do_pri_with(Item/Seq,Constraints,Priority)
Performs `uvm_do() along with constraints defined and priority
mentioned.
`uvm_send_pri(Item/Seq,Priority)
create() and randomize() are skipped, rest all other steps are
executed with priority mentioned.
`uvm_rand_send_pri(Item/Seq,Priority)
Only create() is skipped, rest all other steps are executed with
priority mentioned.
`uvm_rand_send_pri_with(Item/Seq,Priority,
Constraints)
create() is skipped, rest all other steps are executed along with
constraints defined with priority mentioned.
`uvm_declare_p_sequencer(SEQUENCER)
This macro is used to declare a variable p_sequencer whose type
is specified by SEQUENCER. by using p_sequencer
handle, properties of sequencer can be accessed.
1.create_item() / create req 2.wait_for_grant() 3.randomize the req 4.send the req
5.wait for item done 6.get response.
116.
Writing sequence usingdo_macros
//`uvm_do
class mem_sequence extends uvm_seque
nce#(mem_seq_item);
`uvm_object_utils(mem_sequence)
//Constructor
function new(string name = "mem_seque
nce");
super.new(name);
endfunction
virtual task body();
`uvm_do(req)
endtask
endclass
//`uvm_create and `uvm_send
class mem_sequence extends uvm_sequence#(mem
_seq_item);
`uvm_object_utils(mem_sequence)
//Constructor
function new(string name = "mem_sequence");
super.new(name);
endfunction
virtual task body();
`uvm_create(req)
assert(req.randomize());
`uvm_send(req);
endtask
endclass
117.
Writing sequence usingdo_macros
//`uvm_rand_send
class mem_sequence extends uvm_sequen
ce#(mem_seq_item);
`uvm_object_utils(mem_sequence)
//Constructor
function new(string name = "mem_sequen
ce");
super.new(name);
endfunction
virtual task body();
`uvm_create(req)
`uvm_rand_send(req)
endtask
endclass
//`uvm_do_with
class mem_sequence extends uvm_sequence#(mem
_seq_item);
`uvm_object_utils(mem_sequence)
//Constructor
function new(string name = "mem_sequence");
super.new(name);
endfunction
virtual task body();
`uvm_do_with(req,{req.wr_en == 1;})
endtask
endclass
118.
Writing sequence usingdo_macros
//`uvm_rand_send_with
class mem_sequence extends uvm_sequen
ce#(mem_seq_item);
`uvm_object_utils(mem_sequence)
//Constructor
function new(string name = "mem_sequen
ce");
super.new(name);
endfunction
virtual task body();
`uvm_create(req)
`uvm_rand_send_with(req,{req.rd_en == 1;}
)
endtask
//calling sequence’s inside sequence
class wr_rd_seq extends uvm_sequence#(mem_seq_item);
write_sequence wr_seq;
read_sequence rd_seq;
`uvm_object_utils(wr_rd_seq)
//Constructor
function new(string name = "wr_rd_seq");
super.new(name);
endfunction
virtual task body();
`uvm_do(wr_seq)
`uvm_do(rd_seq)
endtask
endclass
Need for m_sequencer,p_sequencer
• In SystemVerilog based OVM/UVM methodologies, the sequence is an object with limited life time
unlike a component which has a lifetime through out simulation.
• The sequence is created , started and once done, de-referenced from memory and this can be any time
in the duration of a test.
• So if we want to access anything from the testbench hierarchy (which are components) - the sequence
would need a handle to the sequencer on which the sequence is running.
• Note that sequencer is a component
• m_sequencer is a handle of type uvm_sequencer_base which is available by default in a sequence
• To access the real sequencer on which sequence is running , you would need to typecast the
m_sequencer to the physical sequencer which is generally called p_sequencer (though you could
name it any)
• We do not use them only in virtual sequences. These can be used in any sequence, if we need any
functionality of sequencer in sequence.
121.
Example for m_sequencer,p_sequencer
• Example where a sequence(object) wants to access a clock monitor which is available with its sequencer
(component)
• //Typecast the m_sequencer base type to p_sequencer because get access to clock monitor
//A test_sequencer class derived from base UVM sequencer
//Lets say, it has a clock monitor component to access clock.
class test_sequencer_c extends uvm_sequencer;
clock_monitor_c clk_monitor;
endclass
//Here is a test sequence that runs on the test_sequencer
//Lets say, sequence need access to sequencer to get access to clock monitor
class test_sequence_c extends uvm_sequence;
test_sequencer_c p_sequencer; //p_sequencer need to declare, m_sequencer by default it
available
clock_monitor_c my_clock_monitor;
task pre_body()
//Typecast the m_sequencer base type to p_sequencer
if(!$cast(p_sequencer, m_sequencer)) begin
`uvm_fatal("Sequencer Type Mismatch:", " Worng Sequencer");
end
//get access to clock monitor
my_clock_monitor = p_sequencer.clk_monitor;
endtask
endclass
122.
m_sequencer, p_sequencer
• m_sequenceris a generic sequencer pointer of type uvm_sequencer_base. It will always exist for
a uvm_sequence and is initialized when the sequence is started.
• The p_sequencer is a type specific sequencer pointer, created by registering the sequence to a sequencer
using the `uvm_declare_p_sequencer macros.
• Being type specific, you will be able to access anything added to the sequencer (i.e. pointers to other
sequencers, etc.).
• p_sequencer will not exist if the `uvm_declare_p_sequencer macros isn’t used.
• m_sequencer is a handle of type uvm_sequencer_base while p_sequencer is a handle of
type user_defined_sequencer.
123.
contin,,,,
• The user_defined_sequenceris a grandchild of uvm_sequencer_base class.
• When we start a sequence, we provide an object handle of our user_defined_sequencer.
• Internally, in start method, this child class object is assigned into parent handle called m_sequencer.
• So, a static casting occurs such that a parent class handle points to child class object
(m_sequencer = user_defined_sequencer_object).
• Now, when referring to sequence, if a p_sequencer is defined, the macro `uvm_declare_p_sequencer expands
to a function that declares a user_defined_sequencer handle known as p_sequencer.
• This function then casts the m_sequencer (parent class handle) back to p_sequencer (child class handle)
using dynamic casting ($cast).
124.
m_sequencer vs p_sequencer
m_sequencer
•For a sequence, m_sequencer is a
handle to the sequencer on which the
sequence runs on.
• m_sequencer exists by default in UVM
sequences
• It's set automatically when you call
start()
p_sequencer
• For a sequence, p_sequencer is a
specific-type of sequencer which you
would like the sequence to run on
• P_sequencer doesn’t exist by default in
sequences declare using
`uvm_declare_psequencer(“sequencer_t
ype”)
• Implement a function to set a value
Why Sequence isnot directly connected to Driver in UVM
• In SV, the Transgenerator is randomizing all the transactions sending all these transactions
at a time to the driver through mailbox.
• Here we don’t know that driver is getting all transactions and sending to DUT, the driver
doesn’t give any response
• In UVM , the sequence is generating and randomizing each transaction, before sending
transaction to driver it sends request to driver through sequencer
• For each transfer it gets the response from the driver
• Driver gives response like get_next_item and item_done responses to sequence through this
sequencer
127.
What is VirtualSequence
• Virtual sequence is a container which consists of different Sequences inside in it
• Virtual sequence is used to start multiple sequences on different sequencers
• When multiple sequences are there, then virtual sequence should be used
• Inside the Virtual sequence, different sequences ,sequencers and Virtual sequencer handles
are declared
128.
What is VirtualSequencer
• It just contains the handles of different sequencers
• When multiple sequencers are there in Environment then Virtual sequencer should
be required
• Virtual Sequencer is a Sequencer that is not connected to the UVM Driver itself,
but contains the handles of the target Sequencer in the Testbench hierarchy.
129.
When we requireVirtual Sequence/Virtual Sequencer
Same stimuli Different stimulus
130.
When we needVirtual Sequence/Virtual Sequencer
Scenario-1
• Let us consider a simple case where we are integrating two such blocks: two sequencers driving
these two blocks.
• From the top-level test, we will need a way to control these two sequencers.
• This can be achieved by using a virtual sequencer and virtual sequences.
Scenario-2
• Another scenario let’s consider the DUT is having 2 different interface ports, in this situation,
there would be 2 Agents serving each interface port inside the UVM Testbench.
• Virtual Sequence will co-ordinate & synchronize the Transactions for the 2 Agents to generate
the simulation uses cases using the corresponding Sub-Sequences.
• Virtual Sequence decides which Agent’s Sequence will start first and the order of
Sub-Sequences execution.
• We can say, Virtual Sequence acts like a Controller of the simulation data being generated for
the DUT.
131.
How virtual sequenceworks
VIRTUAL SEQUENCE SUB SEQUENCES PRIMITIVE SEQUENCES
Do not create any Transaction items Create Transaction items
WR_sequence
RD_sequence
WR_sequence
RD_sequence
WR_sequence
RD_sequence
VIRTUAL
SEQUENCE
APB_SEQ
AHB_SEQ
AXI_SEQ
132.
Virtual Sequence implementation
•By using 2 approaches we can implement Virtual Sequence
• 1st
Approach: Virtual sequence will contain handles of Sequencers on which
subsequences are to be executed(Stand alone Virtual Sequence, without virtual
sequencer)
• 2nd
Approach: Virtual sequence will run on Virtual Sequencer, Virtual sequencer will
contain sequencers handle(with virtual sequencer)
Virtual Sequence implementation
•Virtual Sequence declaration which includes target Sequencers handles
• The way a Virtual Sequence starts the Sub-Seqs on target Sequencers
• The way a Virtual Sequence is started from a Test class
As shown in the diagram, Virtual Sequence contains
two Sequencer handles i.e. SQR_AHB & SQR_AXI.
• There are 2 Agents i.e. AHB Agent & AXI Agent
which physically contains 2 Sequencers.
• These 2 Sequencers are assigned to the Sequencer
handles inside Virtual Sequence in a Test.
• As per the shown diagram, Virtual Sequence also
creates two Sequences which are to be run on the
Sequencers of the respective Agents.
135.
Virtual Sequence implementation
/////Base Virtual Sequence Class
class base_vseq extends uvm_sequence
#(uvm_sequence_item);
`uvm_object_utils(base_vseq)
/// Target Agent Sequencers
uvm_sequencer #(ahb_txn) SQR_AHB;
uvm_sequencer #(axi_txn) SQR_AXI;
/// Constructor
function new (string name = "base_vseq");
super.new(name);
endfunction: new
endclass: vseq_base
///// Virtual Sequence Class
class my_vseq extends base_vseq;
`uvm_object_utils(my_vseq)
/// Constructor function new (string name = "my_vseq");
super.new(name);
endfunction: new
/// Sequence Body Task
task body();
ahb_seqeunce ahb_seq;
axi_sequence axi_seq;
ahb_seq = ahb_sequence::type_id::create("ahb_seq");
axi_seq = axi_sequence::type_id::create("axi_seq");
fork
abh_seq.start(SQR_AHB);
axi_seq.start(SQR_AXI);
join
• Create a “Base Virtual Sequence” which may contain
the handles of all the required target Sequencers.
• Later this Base Virtual Sequence can be extended to
create the Virtual Sequence with the code to start the
Sub-Sequences on the target Sequencers.
• we got two classes i.e. & my_vseq class. base_vseq
is the base virtual sequence class and my_vseq is the
intended Virtual Sequence.
• Base virtual sequence contains the handle of the two
target Sequencers i.e. SQR_AHB & SQR_AXI.
• Virtual Sequence class is extended from the Base
Virtual Sequenceclass.
• It creates the two Sub-Sequences
i.e ahb_seq & axi_seq using
the Factory mechanism.
• Later inside the body() task the Sub-Sequences are
started on the target Agent’s Sequencer by the
Virtual Sequence.
136.
Inside the Testand how the Virtual Sequence is started from the Test?
///// Base Test Class
class base_test extends uvm_test;
`uvm_component_utils(base_test);
/// Environment Class Instantiation top_env Env;
/// Constructor function new (string name = "base_test",
uvm_component parent = null);
super.new(name, parent); endfunction: new
/// Build Phase function void build_phase (uvm_phase phase);
Env = top_env::type_id::create("Env");
endfunction: build_phase
/// Method to Connect Sequencer Handles in VSEQ
function void init_vseq (base_vseq vseq);
vseq.SQR_AHB = test.env.ahb_agent.SQR_AHB;
vseq.SQR_AXI = test.env.axi_agent.SQR_AXI;
endfunction: init_vseq
endclass: base_test
///// Main Test
class test extends base_test;
`uvm_component_utils(test)
/// Constructor function new (string name = "test",
uvm_component parent = null); super.new(name, parent);
endfunction: new
/// Run Phase
task run_phase (uvm_phase phase); /// Create the Virtual
Sequence my_vseq vseq = my_vseq::type_id::create("vseq");
phase.raise_objection(this); /// Virtual Sequence Initialization
init_vseq(vseq); /// Start the Virtual Sequence
vseq.start(null);
phase.drop_objection(this);
endclass: test
• In the test base class i.e. base_test, shown UVM
code, a method i.e. init_vseq() is created
• which is used to assign the sequencer handles to
the handles in classes derived from the virtual
sequence base class.
• Inside the main test which is derived from the base
test, Virtual Sequence is created using Factory.
• Later, the initialization method i.e. init_vseq() is
being called to connect the Sequencers handle.
• Finally Virtual Sequence is started using “Null”
since this Virtual Sequence is NOT started on any
particular Sequencer.
Virtual Sequence implementation
•Virtual Sequencer is a Sequencer that is not connected to the UVM Driver itself but contains the
handles of the target Sequencer in the Testbench hierarchy.
• In the diagram below, there is an example UVM Testbench environment to show the Virtual
Sequencer’s application and 2nd approach of Virtual Sequence Implementation:
Virtual Sequencer is the part of the Environment
i.e. “Env”.
Virtual Sequencer contains the handles of the
target Sequencers i.e. & which are physically
located inside the Agents i.e. AHB Agent & AXI
Agent respectively.
These target Sequencers handles assignment will
be done during the connect phase of the
Environment class..
Virtual Sequence is located outside the Environment class & it is created in the run_phase()
method of the Test. The Virtual Sequence is designed to run on the Virtual Sequencer & Virtual
Sequence also gets the handles of the target Sequencers from the Virtual Sequencer.
139.
Virtual Sequencer class
//Virtual Sequencer
Class class virtual_seqr extend uvm_sequencer;
`uvm_component_utils(virtual_seqr)
// Target Sequencer Handles
ahb_seqr SQR_AHB;
axi_seqr SQR_AXI;
// Constructor
function new (string name = "virtual_seqr",
uvm_component parent);
super.new(name, parent);
endfunction: new
endclass: virtual_seqr
• Virtual Sequencer
i.e. “virtual_seqr” class is declared
by extended the UVM base
class uvm_sequencer.
• Target Sequencer handles are also
declared inside it.
140.
Virtual Sequence class
//Base Virtual Sequence
class base_vseq extends uvm_sequence
#(uvm_sequence_item); `uvm_object_utils(base_vseq)
// Virtual Sequencer Handle
virtual_seqr v_sqr;
// Target Sequencers Handle
ahb_seqr SQR_AHB;
axi_seqr SQR_AXI;
// Constructor
function new (string name = "base_vseq"); super.new(name);
endfunction: new
// Body Task (Assign target sequencers handle)
task body();
if (!$cast(v_sqr, m_sequencer))
begin
`uvm_error(get_full_name(), "Virtual Seqr pointer cast
failed")
end
SQR_AHB = v_sqr.SQR_AHB;
SQR_AXI = v_sqr.SQR_AXI;
endtask: body
endclass: base_vseq
// Virtual Sequence
class my_vseq extends base_vseq;
`uvm_object_utils(my_vseq)
// Constructor
function new (string name = "my_vseq");
super.new(name);
endfunction: new
// Body Task(starting the sub-sequences)
task body();
// Assigning the Sub-Sequencer Handles
super.body;
// Sub-Sequence Creation & Execution
ahb_sequence ahb_seq; axi_sequence axi_seq;
ahb_seq = ahb_sequence::type_id::create("ahb_seq");
axi_seq = axi_sequence::type_id::create("axi_seq");
repeat(30)
begin
ahb_seq.start(SQR_AHB); axi_seq.start(SQR_AXI);
end
endtask: body
endclass: my_vseq
First, a Base Virtual Sequence will be declared & later Virtual Sequence will be derived from the base virtual
sequence.
141.
Environment class
// Environment
Classclass Environment extends uvm_env;
`uvm_component_utils(Environment)
// Virtual Sequencer Handle
virtual_seqr v_sqr;
// Agents Handles
ahb_agent AHB_AGNT;
axi_agent AXI_AGNT;
// Constructor
function new (string name = "Environment", uvm_component
parent);
super.new(name, parent);
endfunction: new
// Build Phase
function void build_phase (uvm_phase phase);
v_sqr = virtual_seqr::type_id::create("v_sqr");
AHB_AGNT=ahb_agent::type_id::create("AHB_AGNT");
AXI_AGNT = axi_agent::type_id::create("AXI_AGNT");
endfunction: build_phase
// Connect Phase
function void connect_phase (uvm_phase phase);
v_sqr.SQR_AHB = AHB_AGNT.m_sequencer;
v_sqr.SQR_AXI = AXI_AGNT.m_sequencer;
endfunction: connect_phase
• In the Environment class
i.e. “Environment”, Virtual Sequencer
is instantiated & built along with two
Agents
i.e. “AHB_AGNT” & “AXI_AGNT”.
• Target Sequencer handles are also
assigned in the connect_phase().
• Usage of a flexible & handy feature of
UVM i.e. “m_sequencer” is being
shown which by default points to the
UVM Sequencer derived from
the uvm_sequencer.
142.
Environment class
// MainTest
class Test extends uvm_test;
`uvm_component_utils(Test)
// Instantiations
my_vseq vseq;
Environment Env;
// Constructor
function new (string name = "Test", uvm_component parent =
null);
super.new(name, parent);
endfunction: new
// Build Phase
function void build_phase (uvm_phase phase);
Env = Environ::type_id::create("Env");
endfunction: build_phase
// Run Phase
task run_phase (uvm_phase phase);
// Create the Virtual Sequence & Environment
vseq = my_vseq::type_id::create("vseq");
phase.raise_objection(this);
// Start the Virtual Sequence
vseq.start(Env.v_sqr);
phase.drop_objection(this);
endtask: run_phase
• Virtual Sequence is started on the
Virtual Sequencer from the Test
• In the Test class i.e. “Test”, both
Environment & Virtual Sequence
i.e. “Environment” & “my_vseq”
are instantiated and created.
• Finally, Virtual Sequence is started
on the Virtual Sequencer which
exists inside the Environment.
UVM Sequence ArbitrationMechanism
• Multiple sequences can interact concurrently with a driver connected to a single interface.
• The sequencer supports an arbitration mechanism to ensure that at any point of time only one
sequence has access to the driver.
• The choice of which sequence can send a sequence_item is dependent on a user-selectable
sequencer arbitration algorithm.
• There are six built-in sequencer arbitration mechanisms that are implemented in UVM.
• There is also an additional hook to implement a user-defined algorithm.
• The sequencer has a method called set_arbitration() that can be called to select which
algorithm the sequencer should use for arbitration.
145.
Contin,,,
• The sixalgorithms that can be selected are as follows:
1.SEQ_ARB_FIFO (Default if none specified).
• If this arbitration mode is specified, then the sequencer picks sequence items in a FIFO order
from all sequences running on the sequencer.
• Example: if seq1, seq2, and seq3 are running on a sequencer, it will pick an item from seq1 first,
followed by seq2, and then seq3 if available, and continue.
2.SEQ_ARB_WEIGHTED
• If this arbitration mode is selected, sequence items from the highest priority sequence are always
picked first until none available, then the sequence items from the next priority sequence, and so
on.
• If two sequences have equal priority, then the items from them are picked in random order.
146.
Continu,,,
3.SEQ_ARB_RANDOM
• If thisarbitration mode is selected, sequence items from different sequences are picked in random
order by ignoring all priorities.
4.SEQ_ARB_STRICT_FIFO
• This is similar to SEQ_ARB_WEIGHTED except that if two sequences have the same priority,
then the items from those sequences are picked in a FIFO order rather than in random order.
5.SEQ_ARB_STRICT_RANDOM
• This is similar to SEQ_ARB_RANDOM except that the priorities are NOT ignored.
• The items are picked randomly from sequences with the highest priority first followed by next and
in that order.
6.SEQ_ARB_USER
• This algorithm allows a user to define a custom algorithm for arbitration between sequences.
• This is done by extending the uvm_sequencer class and overriding the
user_priority_arbitration() method.
147.
How to prioritizea sequence?
• The priority is specified by passing an argument to the start() method of the sequence.
• The priority is decided based on relative values specified for different sequences.
For Example:
• If two sequences are started as follows, the third argument specifies the priority of the
sequence.
• seq_1.start(m_sequencer, this, 700); //Highest priority
• seq_2.start(m_sequencer, this, 500); //Next Highest priority
• seq_3.start(m_sequencer, this, 300); //Lowest priority among three sequences
Sequencer and drivercommuniction
• In UVM, there is a mechanism to be followed when we want to send the transactions from the
sequencer to the Driver in order to provide stimulus to the DUT.
• The transfer of request and response sequence items between sequences and their target driver is
facilitated by a TLM communication mechanism implemented in the sequencer.
• A particular Sequence is directed to run on a Sequencer which in turns further breaks down into a
series of transaction items
• These transaction items are needs to be transferred to the Driver where these transaction items
are converted into cycle based signal/pin level transitions.
150.
Sequencer side operation
•To send a sequence_item to a driver there are four steps that need to occur:
Step 1 – Creation: Creating the “transaction item” with the declared handle using factory
mechanism.
Step 2 - Ready - start_item():The start_item() call is made, passing the sequence_item handle as an
argument. This call blocks until the sequencer grants the sequence and the sequence_item access to
the driver.
Step 3 – Set:The sequence_item is prepared for use, usually through randomization, but it may also
be initialised by setting properties directly.
Step 4 - Go - finish_item(): The finish_item() call is made, which blocks until the driver has
completed its side of the transfer protocol for the item. No simulation time should be consumed
between start_item() and finish_item().
Step 5 - Response - get_response():This step is optional, and is only used if the driver sends a
response to indicate to indicate that it has completed transaction associated with the
sequence_item. The get_response() call blocks until a response item is available from the
sequencers response FIFO.
151.
Sequencer and drivercommuniction
• These are the operational steps from a Sequence which we want to execute using a Sequencer
that is connected to a Driver inside an “Agent”.
• Whole of this process is shown in the Figure 1 & Figure 2 below:
Fig: Driver & Sequencer Interaction for
Transaction Exchange
Fig: Transaction Execution Flow Between a Sequencer,
Driver & Virtual Interface
152.
Driver side operation
•Steps are made by the Driver in order to complete the communication with Sequencer(Sequence)
Declaring the “transaction item” with a handle.
get_next_item(): Calling the “get_next_item(<transaction_item_handle>)“.
Default transaction_handle is “req”. “get_next_item()” blocks the processing until the “req” transaction
object is available in the sequencer request FIFO & later “get_next_item” returns with the pointer of the
“req” object.
try_next_item(): This is a non-blocking variant of the get_next_item() method.
It will return a null pointer if there is no REQ sequence_item available in the sequencers request FIFO.
However, if there is a REQ sequence_item available it will complete the first half of the
driver-sequencer handshake and must be followed by an item_done() call to complete the handshake.
Next, Driver completes its side protocol transfer while working with the virtual interface.
item_done(): Calling the “item_done()” OR “item_done(rsp)“.
It indicates to the sequencer the completion of the process. “item_done” is a non-blocking call & can be
processed with an argument or without an argument.
If a response is expected by the Sequencer/Sequence then item_done(rsp) is called.
It results in Sequencer response FIFO is updated with the “rsp” object handle.
Introduction
• Transaction-Level Modeling(TLM) is used for communication among modules.
• TLM is the concept in which transaction based methods are implemented, these methods can be
used for communication between the modules
• The UVM provides TLM library with transaction-level interfaces, ports, exports, imp ports, and
analysis ports.
• All these TLM elements are required to send a transaction, receive transaction, and transport
from one component to another. where each one plays its unique role.
• TLM Interfaces consists of methods for sending and receiving the transaction
• All different types of TLM Ports are used like PIPES to connect between the components
155.
Continu,,,
• The UVMTLM library provides,
• TLM1 – The TLM1 ports provide blocking and non-blocking pass-by-value transaction-level
interfaces.
• TLM2 – The TLM2 sockets provide blocking and non-blocking transaction-level interfaces with
well-defined completion semantics.
• Sequencer Port – A push or pull port, with well-defined completion semantics.
• Analysis – The analysis interface is used to perform non-blocking broadcasts of transactions to
connected components
156.
Advantages
• Data istransferred at high level of abstraction. Transactions which are developed by extending
the uvm_sequence_item can be transferred between components using method calls.
• These methods are not hierarchical fixed, so that components can be reused.
• The advantages of TLM interfaces are
1) Higher level abstraction
2) Reusable. Plug and play connections.
3) Maintainability
4) Less code.
5) Easy to implement.
6) Faster simulation.
7) Connect to SystemC.
8) Can be used for reference model development.
157.
Continu,,
• connection arebetween port and exports not in component
• these are parameterized by xtn class.
• multiple language supported(system c) where mailbox is only SV construct.
• mailbox is only unidirectional.
158.
TLM1
• UVM TLMprovides unidirectional and bidirectional,
1. TLM interfaces
2. ports
3. exports
4. imp ports
5. analysis portss
6. FIFOs
• Each TLM interface is either blocking, non-blocking, or a combination of these two.
1. Blocking – Blocking TLM methods call will not return until the transaction has been
successfully sent or retrieved
2. Non-blocking – Non-Blocking TLM methods call attempts to convey a transaction without
consuming simulation time
3. Combination – A combination interface contains both the blocking and nonblocking variants.
159.
Continu,,
• TLM isused for communication among the components.
• The most basic TLM operation allows one component to sends a transaction packet to
another component.
• Let’s consider the two components producer and consumer, where the producer
generates and sends the transaction packet to the consumer through TLM ports.
• Symbolic representation of TLM Ports is shown below,
• put() isone of the TLM method which can be used to communicate between a Producer&
a Consumer.
• port is the interface which calls put() method and export is the interface which provides the
implementation of put() method.
• That way, TLM communication is independent of the Producer and Consumer abstraction level.
TLM interface put methods
/////////// Producer //////////////////////////
class producer extends uvm_component;
`uvm_component_utils(producer)
uvm_blocking_put_port #(txn) my_port;
function new (string name, uvm_component parent);
super.new(name, parent);
my_port = new (“my_port”, this);
endfunction: new
task run_phase(uvm_phase phase);
for (int packet = 1; packet<11; packet++)
begin
txn t;
t = txn::type_id::create(“t”, this);
`uvm_info(“PID”, $sformatf(“Packet no. %d is sent”,
packet), UVM_LOW)
my_port.put(t);
#10;
end
endtask: run_phase
endclass: producer
/////////// Consumer //////////////////////////
class consumer extends uvm_component;
`uvm_component_utils(consumer)
uvm_blocking_put_imp #(txn, consumer)
my_export;
function new (string name, uvm_component
parent);
super.new(name, parent);
my_export = new(“my_export”, this);
endfunction: new
task put (txn t);
case(t.kind)
t.READ: $display(“Read transaction”);
t.WRITE: $display(“Write transaction”);
endcase
endtask: put
endclass: consumer
p1.my_port.connect(c1.my_expor
t);
162.
• In termsof purpose, get() method performs the same the put() does – only difference is that get()
pulls the transaction from the Producer yet put()push the transaction to theConsumer.
TLM interface get methods
///////////// Producer ///////////////////
class producer extends uvm_component;
`uvm_component_utils(producer)
///// Export Declaration
uvm_blocking_get_imp #(my_txn, producer)
my_export;
//// Constructor
function new (string name, uvm_component
parent);
super.new(name, parent);
my_export = new(“my_export”, this);
endfunction: new
//// get() task implementation
task get(output my_txn t);
my_txn tmp;
tmp = my_txn::type_id::create(“tmp”, this);
t = tmp;
`uvm_info (“PID”, $sformatf(“Transaction type %s
is sent”, t.kind), UVM_LOW)
endtask: get
endclass: producer
/////////// Consumer ///////////////////
class consumer extends uvm_component;
`uvm_component_utils(consumer)
//// Port Declaration
uvm_blocking_get_port #(my_txn) my_port;
function new (string name, uvm_component
parent);
super.new(name, parent);
my_port = new(“my_port”, this);
endfunction: new
task run_phase(uvm_phase phase);
for (int i=1; i<11; i++)
begin
my_txn txn;
`uvm_info("CID", $sformatf("Transaction no. %0d is
asked for", i), UVM_LOW)
my_port.get(txn);
#10;
`uvm_info(“CID”, $sformatf(“Transaction type %s
is received”, txn.kind), UVM_LOW)
end
endtask: run_phase
endclass: consumer
c1.my_port.connect(p1.my_expor
t);
163.
TLM interface methods
•peek
• peek method obtain a transaction without consuming it
• Calling <port>.peek(trans) retrieve transaction from other component
• peek() method call is a blocking call.
• The returned transaction is not consumed. A subsequent peek or get will return the same transaction
Non-blocking methods
• try_put
• the try_put method is used to send a transaction to another component without blocking the
execution
• Calling <port>.try_put(trans) sends a transaction to another component, if possible
• try_put method returns 1 If the component is ready to accept the transaction, otherwise it returns 0
164.
TLM interface methods
can_put
•can_put() method call returns 1 if the component is ready to accept the transaction, otherwise, it returns 0
• no argument must be passed to can_put, this method is used to see whether the other component is ready
to accept the trans
try_get
• the try_get method is used to retrieve transaction from another component without blocking the execution
• Calling <port>.try_get(trans) retrieve transaction from another component, if possible
• try_get method returns 1 if the transaction is available, otherwise, it returns 0
can_get
• can_get() method call returns 1 if the component can get transaction immediately, otherwise, it returns 0
• no argument must be passed to can_get, this method is used to see whether any transaction is available to
get
165.
TLM interface methods
transport
•Calling <port>.transport(req, resp) method executes the given request and returns the
response in the given output argument
• The transport method call is blocking, it may block until the operation is complete
nb_transport
• Calling <port>.nb_transport(req,resp) the method executes the given request and returns the
response in the given output argument, if possible
• If for any reason the operation could not be executed immediately, then a 0 must be
returned, otherwise 1
166.
TLM Export
• TheTLM Export is a port that forwards a transaction from a child component to its parent
• The TLM Export has unidirectional and bidirectional ports
• An export can be connected to any compatible child export or imp port.
• It must ultimately be connected to at least one implementation of its associated interface
• Export Methods
• new
• This is a constructor method used for the creation of TLM Export.
TLM Export clases
uvm_*_export#(T) //unidirectional export class
uvm_*_export #(REQ,RSP) //bidirectional export class
Type parameters,
T – The type of transaction to be communicated by the export
REQ – The type of request transaction to be communicated by the
export
RSP – The type of response transaction to be communicated by the
export
function new (string name,uvm_component parent,int min_size=1,int max_size=1);
167.
• The TLMImp Port is used to receive the transactions at destination
• TLM Imp Ports has unidirectional and bidirectional ports
• import Methods -new
• This is a constructor method used for the creation of TLM import.
• TRANSPORT IMP CONSTRUCTOR
• MASTER AND SLAVE IMP CONSTRUCTOR
TLM port clases
uvm_*_imp #(T,IMP) //unidirectional port class
uvm_*_imp #(REQ, RSP, IMP, REQ_IMP, RSP_IMP) //bidirectional port class
Type parameters,
T – The type of transaction to be communicated by the imp
IMP – The type of the component implementing the interface. That is the class to which this imp will delegate.
REQ_IMP – The component type that implements the request side of the interface. Defaults to IMP. For master and slave
imps only.
RSP_IMP – The component type that implements the response side of the interface. Defaults to IMP. For master and
slave imps only.
function new(string name, IMP imp)
function new(string name, IMP imp, REQ_IMP req_imp=imp, RSP_IMP rsp_imp=imp)
TLM Import
168.
• The TLMFIFO provides storage for the transactions between two independently running processes.
• We have seen put and get methods operates with only one outstanding transaction at a time i.e it is
allowed to send the transaction Only after consumption of the previously sent transaction, in this
case, the sender and receiver must be in sync else lead to blocking in one of the components.
• What if the case where the sender needs not wait for the receiver acknowledgment
• It just wants to store it in memory and the receiver can consume whenever required.
• In this sender and the receiver needs not to be in sync. Yes With TLM FIFO it is possible.
TLM FIFO
169.
• In TLMFIFO, the sender pushes the transactions to FIFO and whenever it required reiver pops it
out or fetches from the FIFO
• Transactions are put into the FIFO via the put_export method
• Transactions are fetched from the FIFO via the get_peek_export method
• As its FIFO (First In First Out), transactions are fetched from the FIFO in the order they are put
TLM FIFO Classes
Continu,,,
uvm_tlm_analysis_fifo #(T)
uvm_tlm_fifo #(T)
170.
TLM FIFO Methods
•size:The size indicates the maximum size of the FIFO,a value of zero indicates no upper bound
Calling size() returns the size of the FIFO
A return value of 0 indicates the FIFO capacity has no limit
• used: Returns the number of entries put into the FIFO
• is_empty: Returns 1 when there are no entries in the FIFO, 0 otherwise
• is_full: Returns 1 when the number of entries in the FIFO is equal to its size, 0 otherwise
• flush: Calling flush method will Remove all entries from the FIFO
after the flush method call used method returns 0 and the is_empty method returns 1
171.
TLM Analysis_fifo
• Ananalysis_fifo is a uvm_tlm_fifo#(T) with an unbounded size and a write Method
• It can be used any place a uvm_analysis_imp is used
• Typical usage is as a buffer between a uvm_analysis_port in an initiator component and TLM1
target component
TLM Analysis FIFO Classes
• uvm_tlm_analysis_fifo#(T) An analysis_fifo is a uvm_tlm_fifo#(T) with an unbounded size and a
write method
172.
Continu,,,
The analysis_export providesthe write method to all connected analysis ports and parent exports
analysis_export #(T)
Method:function void write (T t)
• Write() method:
• Calling <port>.write(trans) method will broadcasts a transaction to any number of listeners.
• Write method call is a nonblocking call
• As along with the interface methods, TLM ports are required for the communication between
the components.
Introduction
• UVM RegisterLayer is also referred to as UVM Register Abstraction Layer (UVM RAL) which
is defined as the conversion of register sequences into bus sequences
• Need to write and read from those registers in order to verify the proper working of the design.
• It is mainly used to identify the bugs in the testbench instead of doing traditional verification.
• The UVM Register Layer provides a standard base class libraries that enable users to implement
the object-oriented model to access the DUT registers and memories.
• RAL model can be used with multiple interfaces, memory implementation inside the RAL model
and their access methods, information on predictor model to predict the register value based on
their operation, etc..
• It has also a list of ready-made UVM register sequences.
• By merely configuring these sequences users can access and verify the functionality of all the
design registers and memories.
175.
How do verificationengineers make use of RAL?
• Basically all test benches has to mimic the design behavior in order to verify the demanded
functionality of the design.
• Writing and Reading of registers is taken care by the TLM FIFO feature of the UVM.
• But the problem arises when hardware has to modify the register value.
• For example an IN register has to reflect the value of the bit on the pin which has to be read from
the hardware.
• The replicated design in the test bench has to modify some “virtual register” based on the hardware
changes, that has to be compared with the actual register bank for it’s functional correctness.
• That “Virtual register” bank inside the test bench is abstracted as the Register Abstraction
Layer(RAL).
• Generally UVM scoreboards make use of RAL to compare the register values inside RTL with the
required value inside the test bench.
176.
For register access,can’t we proceed without RAL?
• Yes, we can.
• But RAL provides a set of base classes and methods with a set of rules which easies the
effort required for register access.
UVM Register ModelOverview
• The register model is composed of a hierarchy of blocks that map to the design hierarchy
• Which means the RAL model consists of design register fields, registers, and memory.
• Blocks can contain,
• registers
• register files
• memories
• other blocks
• UVM RAL library provides the base class of each and each class has the default built-in methods
in it.
• Register classes cant be used as it is, they must be specialized via extensions to provide an abstract
view that corresponds to the design registers and memories
179.
Continu,,,
uvm_reg shall consistof one or more uvm_reg_field
uvm_reg_file shall consist of one or more uvm_reg
uvm_reg_block shall consist of one or more uvm_reg_file or uvm_mem
180.
Mapping of registermodel components to the environmental
components
Due to a large number of registers in design, this specialization shall be done by a register
model generator
181.
register model generator
•Register model generators are outside the scope of the UVM library.
• A register model can be written or it can be created using a register generator application.
• Writing or Generating the register model is based on a design register specification.
• Writing a register model is easy, but complex designs will be having hundreds or thousands of
registers. in that case, writing the register model is tedious.
• The easiest way to construct a register model is by using a register generation application or
automation tool.
• Automation tools will generate the register model by taking register specification as input, this
includes reg name, width, register fields, access permissions, etc.
• There are paid and free register generators available.
• some of them are RGM – Register and Memory Package by Cadence, ralgen by Synopsys,
Semifore’s RDL, Duolog’s graphical Bitwise, Agnisys’ IDesignSpec, Mentor Graphics’ Certes
Testbench Studio, and Magillem MRV (Magillem Register View).
182.
Mapping UVM RALelements with design elements
• Design block containing four registers, which have two, three, one and one fields respectively, an
internal memory, and external memory.
The architecture of the CPU shows that it
consists of multiple modules
• uvm_reg_block: shall be used to
represent each design module each
module consists of many registers
• uvm_reg_file: shall group the module
registers each module consists of
registers
• uvm_reg shall be used to implement the
design register each register consists of
one or multiple fields
• uvm_reg_field type shall be used
for field implementation
183.
RAL Building blocks
•There are four blocks, which can be used to build basic RAL. They are
• Register block
• Register file
• Register
• Register Filed
184.
1. Register block
•The reg block is written by extending
the uvm_reg_block.
• A block corresponds to a design component/hierarchy
with its own interface(s), registers, register files,
memories, and sub-blocks.
• In simple words, a block can be referred to as a design
module with its own interface(s), registers, register files,
memories, and sub-blocks.
• And it will be having unique address decoding to route
the access to it.
• A register model is an instance of a register block,
which may contain any number of registers, register files,
memories, and other blocks.
185.
2. Register file
•The reg file is written by extending
the uvm_reg_file.
• The reg file shall be used to group the number
of registers or register files.
• The block diagram shows the register file
consists of reg_file_0, reg_file_1 and
reg_file_2.
• Each register file consists of a set of registers.
( registers are shown only in reg_file_2
• Assume that there are registers in reg_file_0
and reg_file_1 )
186.
3. Register
• Theuvm register class is written by extending the uvm_reg.
• A register represents a set of fields that are accessible as a single entity.
• Each register contains any number of fields, which mirror the values of the
corresponding elements in hardware.
187.
4. Register field
•The register field is declared with the type uvm_reg_filed.
• Fields represent a contiguous set of bits.
• All data values are modeled as fields.
• A field is contained within a single register but may have different access policies. access policies
are explained in the next sections.
Register Access Methods
•UVM RAL library classes have built-in methods implemented in it, these methods can be
used for accessing the registers.
• These methods are referred to as Register Access Methods.
• The register model has methods to read, write, update and mirror DUT registers and
register field values, these methods are called API (application programming interface).
• APIs can either use front door access or back door access to DUT registers and register
fields.
• Front door access involves using the bus interface and it is associated with the timing
• Back door access uses simulator database access routines and this happens in zero
simulation time
Register Access Methods
readand write
• read() returns and updates the value of the DUT register.
• write() writes and updates the value of the DUT register.
• both read and write can be used for front door access or back door access.
• In read or write value will be updated by the bus predictor on completion of the front door
read or write cycle and automatically in back door read or write cycle.
Front_door access back_door access
192.
Register Access Methods
Peekand poke
• peek() reads the DUT register value using a backdoor
• poke() writes a value to DUT register using backdoor
set and get
• set() and get() writes and reads directly to the desired
value.
• set and get methods operates on the register model
desired value, not accesses to DUT register value.
• The desired value can be updated to the DUT using the
update method.
193.
Register Access Methods
update
•if there is a difference between desired value and mirrored
value, update() will initiate a write to register. update method
can be used after the set method.
mirror
• mirror() reads the updated DUT register values.
• The mirroring can be performed in the front door or
back door( peek() ).
194.
Register Access Methods
randomize
•randomize() randomizes register or field values with or
without constraints.
• As per the requirement register values can be modified in
post_randomize()
• After randomization update() can be used to update the
DUT register values.
reset
• reset() sets the register desired and mirrored value to the pre-defined reset value
195.
Constructing Register Model
1.Register Field
• Register fields are declared with uvm_reg_field class type.
• Register fields are declared in register class
• The field name must be unique within the scope of its declaration
• The access policy of a field is specified using the uvm_reg_field::configure() method
• Configure method has to be called from the build() method of the register that instantiates it
(refer to register example)
uvm_reg_field reg_name;
196.
2. Register
• Theregister is constructed by writing a class extended from the uvm_reg class.
• There must be one class per unique register type
• The name of the register type class must be unique within the scope of its declaration
• The uvm_reg_field::configure() method shall be called from the register type build method
class my_reg extends uvm_reg;
rand uvm_reg_field Field_0;
rand uvm_reg_field Field_1;
endclass
class my_reg extends uvm_reg;
virtual function build();
this.Field_0 = my_reg::type_id::create(.name(“Field_0”), .parent(null),.contxt(get_full_name()))
;
this.Field_0.configure(this, ...);
endfunction
endclass
197.
3. Register File
•A register file type is constructed by writing a class extended from the uvm_reg_file class
• The name of the register file type class must be unique within the scope of its declaration
• Register files can contain other register files.
• The build() method shall call the configure() method for all register and register file class properties
• specifying get_block() for the parent block and this for the parent register file
class my_reg extends uvm_reg;
virtual function build();
this.Field_0 = my_reg::type_id::create(.name(“Field_0”), .parent(null),.contxt(get_full_name()))
;
this.Field_0.configure(this, ...);
endfunction
endclass
class my_reg_file extends uvm_reg_file;
`uvm_object_utils(my_reg_file)
endclass
a. map method()
•A virtual map() function, with uvm_reg_map and address offset arguments map() method shall call
uvm_reg_map::add_reg()
• For all register class properties, adding the value of the address offset argument to the offset of the
register in the register file map() method shall call the map() method of all register file class
properties
• Adding the value of the address offset argument to the offset of the register file base offset
• The map() method may call the add_hdl_path() method for all register or register file class
properties
virtual function map(uvm_reg_map mp, uvm_reg_addr_t
offset);
mp.add_reg(this.reg_0, base_addr + 'h0);
mp.add_reg(this.reg_1, base_addr + 'h4;
this.rf.map(mp, base_addr + 'h100);
endfunction
200.
b. set_offset() method
•A virtual set_offset() function, with a uvm_reg_map and address offset arguments, may also
be implemented
• The set_offset() method shall call the set_offset() method for all register and register file
class properties
virtual function set_offset(uvm_reg_map
mp, uvm_reg_addr_t offset);
this.reg_0.set_offset(mp, base_addr + 'h0);
this.reg_1.set_offset(mp, base_addr + 'h4);
this.rf.set_offset(mp, base_addr + 'h100);
endfunction
201.
Memory Types
• Amemory type is constructed using a class extended from the uvm_mem class
• The name of the memory type class must be unique within the scope of its
declaration
class my_mem extends uvm_mem;
`uvm_object_utils(my_mem)
endclass
202.
Register block
• Ablock is constructed by writing a class extended from the uvm_reg_block class
• The name of the block type class must be unique within the scope of its declaration
• The block type must contain a class property for each,
• named address map
• register
• register file
• memory
• sub-block
• These shall have the rand attribute
• The build() method shall instantiate all named address maps by calling the
uvm_reg_block::create_map() method
class my_blk extends uvm_reg_block;
`uvm_object_utils(my_blk)
endclass
203.
UVM RAL Predictor
•We know that the UVM Register model maintains the latest design register values in it. but how
Register model will get to know the latest values?
• This will be done by the UVM RAL component Predictor.
• UVM RAL Predictor predicts the register access done through the register model and updates the
RAL Model registers.
• UVM RAL provides the base class uvm_reg_predictor. uvm_reg_predictor updates the register
model based on observed transactions published by a monitor.
• Any register access done through the register model is predicted and updated inherently by the base
classes (implicit prediction)
• Prediction of the register values in the model can also be done explicitly using an external predictor
which also takes care of interface bus transactions not occurring through the register model (explicit
prediction)
204.
Implicit prediction
• Implicitprediction only requires the integration of the register model with one or more bus
sequencers
• Updates to the mirror are predicted automatically (i.e., implicitly) by the register model after
the completion of each read, write, peek, or poke operation
Explicit prediction
• Explicit prediction requires the register model to be integrated with both the bus sequencers
and corresponding bus monitors
• In this mode, the implicit prediction is turned off and all updates to the mirror are predicted
externally (i.e., explicitly) by a uvm_reg_predictor component, one for each bus interface
205.
UVM Register ModelAdapter
• With the UVM Register model, we do design register access, i.e WRITE to the design
register or READ from the design register by calling RAL methods.
• Finally, these transactions have to be placed to design bus, this will be done by RAL
component Adapter.
• The RAL adapter acts as a converter between the RAL model and Interface.
• It converts transactions of RAL methods to Interface/Bus transactions.
• The Adapter converts between register model read, write methods and the interface-specific
transactions
• The transaction adapter is implemented by extending the uvm_reg_adapter class and
implementing the reg2bus() and bus2reg() methods
206.
UVM RAL reg2bus
•reg2bus method converts the RAL transactions to Interface (bus) transactions
UVM RAL bus2reg
• bus2reg method converts the Interface (bus) transactions to RAL transactions
class tb_env extends uvm_env;
reg_model regmodel;
uvm_reg_predictor#(ahb_trans) ahb2reg_predictor;
reg2ahb_adapter reg_adapter;
ahb_agent ahb;
virtual function void build_phase(uvm_phase phase);
ahb2reg_predictor = new(“ahb2reg_predictor”, this);
endfunction
virtual function void connect_phase(uvm_phase phase);
if (regmodel.get_parent() == null) begin
reg_adapter = reg2ahb_adapter::type_id::create(“reg_adapter”,,get_full_n
ame());
...
ahb2reg_predictor.map = regmodel.AHB;
ahb2reg_predictor.adapter = reg_adapter;
ahb.monitor.ap.connect(ahb2reg_predictor.bus_in);
end
endfunction
207.
Integrating RAL toBus Agent
• Once after the RAL implementation, RAL has to be connected with the Bus Agent.
• This section describes connecting RAL with the sequencer and monitor of the bus.
208.
Integrating Bus Sequencers
•All integration approaches require a register model to be configured with one or more bus
sequencers.
• The register model becomes a property of a uvm_reg_sequence subtype that executes
• Directly on a bus sequencer, if there is only one bus interface providing access to the DUT
registers
• As a virtual sequence, if there are one or more bus interfaces providing access to the DUT
registers;
• As a register sequence running
209.
Integrating the RegisterModel with a Bus Monitor
• By default, the register model updates its mirror copy of the register values implicitly.
• Every time a register is read or written through the register model, its mirror value is
updated.
• If other agents on the bus interface perform read and write transactions outside the context of
the register model
• The register model must learn of these bus operations to update its mirror accordingly.
• Integration is accomplished by first instantiating a uvm_reg_predictor component
• uvm_reg_predictor component is then connected to the bus monitor’s analysis port
210.
class tb_env extendsuvm_env;
reg_model regmodel;
uvm_reg_predictor#(ahb_trans) ahb2reg_predictor;
reg2ahb_adapter reg_adapter;
ahb_agent ahb;
virtual function void build_phase(uvm_phase phase);
ahb2reg_predictor = new(“ahb2reg_predictor”, this);
endfunction
virtual function void connect_phase(uvm_phase phase);
if (regmodel.get_parent() == null) begin
reg_adapter = reg2ahb_adapter::type_id::create(“reg_adapter”,,get_full_nam
e());
...
ahb2reg_predictor.map = regmodel.AHB;
ahb2reg_predictor.adapter = reg_adapter;
ahb.monitor.ap.connect(ahb2reg_predictor.bus_in);
end
...
endfunction
211.
Register defines
• UVMregister library has the defines declared in it.
• These are being used in the RAL model base classes, user can override these defines.
uvm_reg_defines are,
1. `UVM_REG_ADDR_WIDTH
2. `UVM_REG_DATA_WIDTH
3. `UVM_REG_BYTENABLE_WIDTH
4. `UVM_REG_CVR_WIDTH
212.
Register defines
1. UVM_REG_ADDR_WIDTH
•Maximum address width in bits
Default value is 64
• Used to define the
uvm_reg_addr_t type
2. UVM_REG_DATA_WIDTH
• Maximum data width in bits
Default value is 64
• Used to define the
uvm_reg_data_t type
3. UVM_REG_BYTENABLE_WIDTH
• Maximum number of byte enable bits
• Default value is one per byte in
`UVM_REG_DATA_WIDTH
• Used to define the
uvm_reg_byte_en_t type
4. UVM_REG_CVR_WIDTH
• Maximum number of bits in a
uvm_reg_cvr_t coverage model set
• Default value is 32


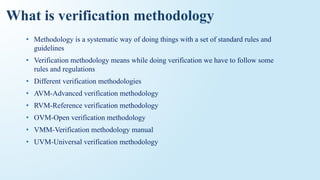
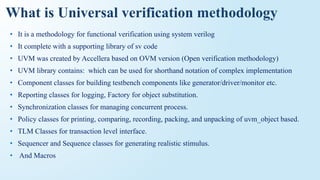
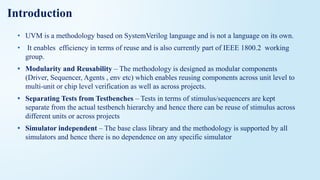
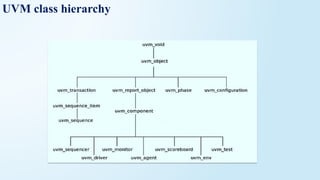

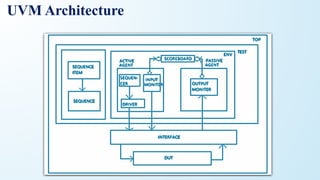
![Sequence_item:
• The sequence-item is written by extending the uvm_sequence_item, uvm_sequence_item inherits from the
uvm_object via the uvm_transaction class.
• Therefore uvm_sequence_item is of an object type.
• The sequence-item consist of data fields required for generating the stimulus.
• In order to generate the stimulus, the sequence items are randomized in sequences.
• Therefore data properties in sequence items should generally be declared as rand and can have constraints
defined.
• Data fields represent the following types of information,
1. Control Information – a type of transfer, transfer size, etc ex:rand bit wr;
2. Payload Information – data content of the transfer ex: rand bit [7:0] wdata
3. Configuration Information – mode of operation, error behavior, etc
4. Analysis Information – fields used to capture information from DUT, ex: output bit[7:0]rdata;
as analysis information fields will be used for capturing response, except these fields the other fields
can be declared as rand and can have constraints associated with it.](https://image.slidesharecdn.com/uvmnewppt-260210151259-3ef9cda8/85/Universal-Verification-Methodology-Used-to-describe-the-Hardware-Digital-Circuits-15-320.jpg)
![class mem_seq_item extends uvm_sequence_item;
//Control Information
rand bit [3:0] addr;
rand bit wr_en;
rand bit rd_en;
//Payload Information
rand bit [7:0] wdata;
//Analysis Information
bit [7:0] rdata;
//Utility and Field macros,
`uvm_object_utils_begin(mem_seq_item)
`uvm_field_int(addr,UVM_ALL_ON)
`uvm_field_int(wr_en,UVM_ALL_ON)
`uvm_field_int(rd_en,UVM_ALL_ON)
`uvm_field_int(wdata,UVM_ALL_ON)
`uvm_object_utils_end
//Constructor
function new(string name = "mem_seq_item");
super.new(name);
endfunction
//constaint, to generate any one among write and read
constraint wr_rd_c { wr_en != rd_en; };
endclass
Sequence_item example](https://image.slidesharecdn.com/uvmnewppt-260210151259-3ef9cda8/85/Universal-Verification-Methodology-Used-to-describe-the-Hardware-Digital-Circuits-16-320.jpg)

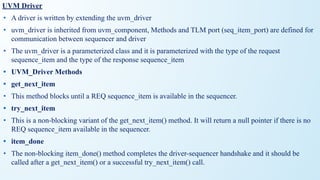
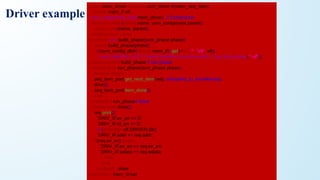
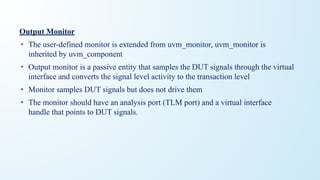
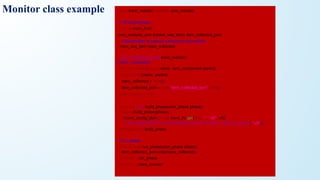
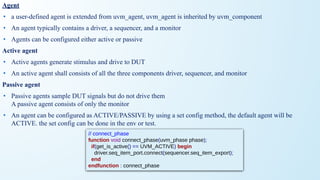
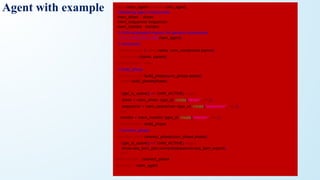
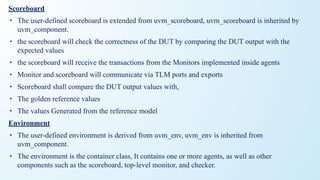
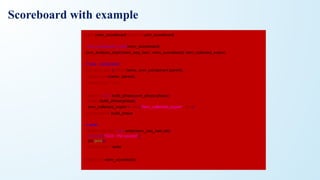

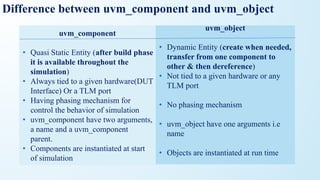
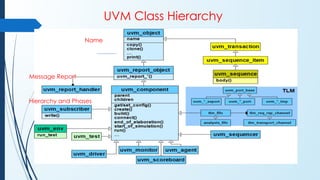
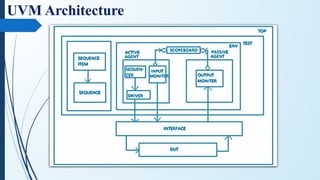

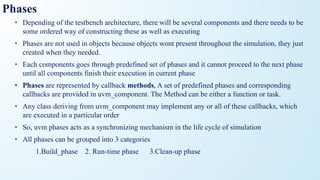
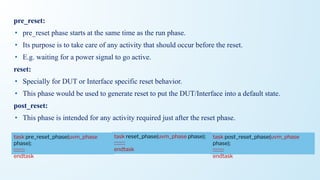
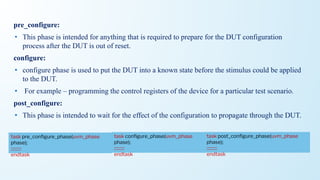

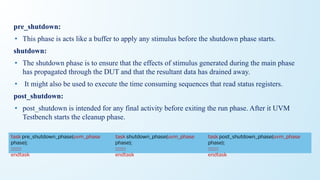
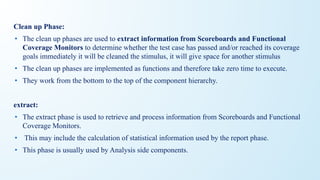


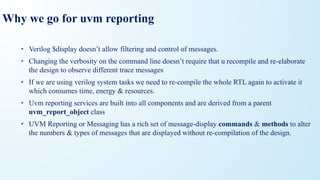
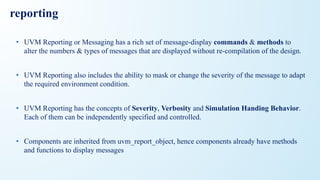
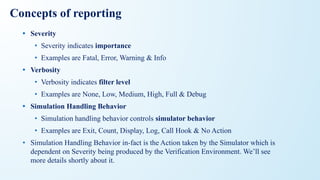
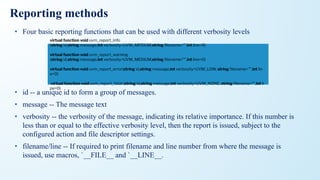
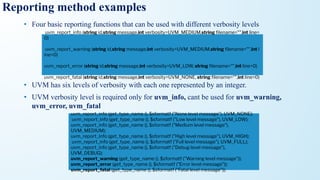
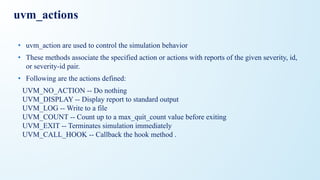
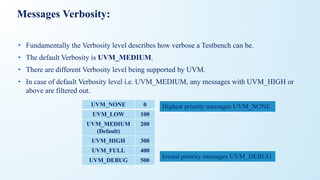
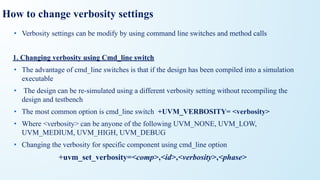
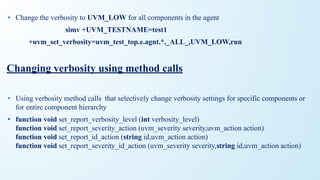
![Using get_type_name, get_full_name, get_name
• There are three built in methods which is used to call inside the reporting macros
• They are get_name(), get_type_name(), get_full_name()
• get_name(): returns the name of the object
`uvm_error(get_name(), “driver“) // :drv [D] driver
• get_full_name(): returns the full hierarchical name of this object
`uvm_error(get_full_name(), “driver“) // :top.test.env.agent1.drv[DRV]driver
• get_type_name(): returns the type name of the object
`uvm_error(get_type_name(), “driver“) // :drv [DRV]driver](https://image.slidesharecdn.com/uvmnewppt-260210151259-3ef9cda8/85/Universal-Verification-Methodology-Used-to-describe-the-Hardware-Digital-Circuits-63-320.jpg)

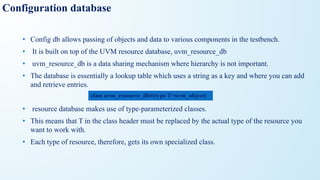
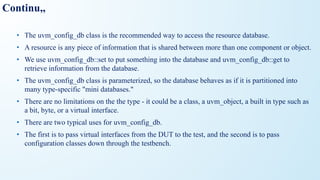
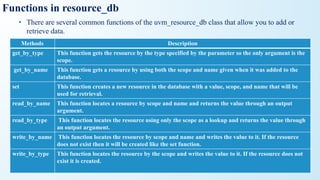

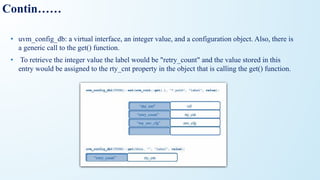

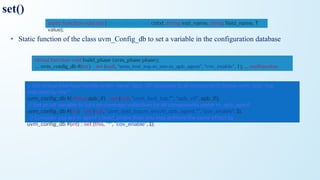

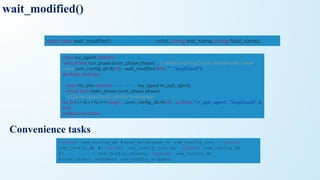

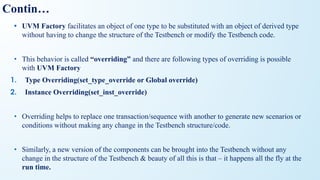
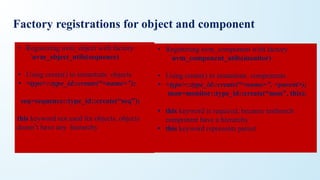

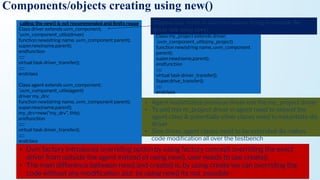
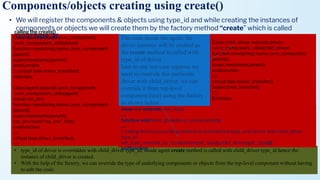
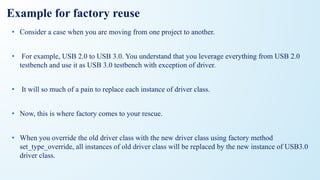
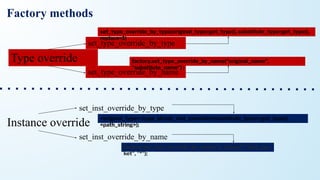
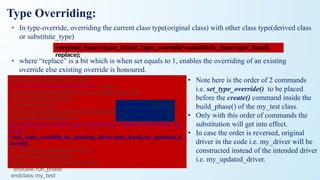
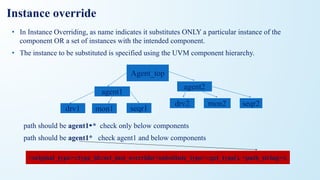

![Utility & field macros example
class ABC extends uvm_object;
rand bit [15:0] m_addr;
rand bit [15:0] m_data;
`uvm_object_utils_begin(ABC)
`uvm_field_int(m_addr, UVM_DEFAULT)
`uvm_field_int(m_data, UVM_DEFAULT)
`uvm_object_utils_end
function new(string name = "ABC");
super.new(name); endfunction
endclass
//field macros are invoked inside the
utility macros
class ABC extends uvm_object;
`uvm_object_utils(ABC)
rand bit [15:0] m_addr;
rand bit [15:0] m_data;
`uvm_field_utils_begin(ABC) // error dis line
`uvm_field_int(m_addr, UVM_DEFAULT)
`uvm_field_int(m_data, UVM_DEFAULT)
`uvm_field_utils_end
function new(string name = "ABC");
super.new(name); endfunction
endclass
Output:Error because uvm_object_utils macro
also calls uvm_field_macros no need to define as
uvm_field_utils_begin, its illegal](https://image.slidesharecdn.com/uvmnewppt-260210151259-3ef9cda8/85/Universal-Verification-Methodology-Used-to-describe-the-Hardware-Digital-Circuits-93-320.jpg)
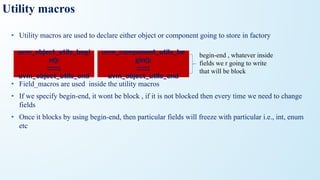
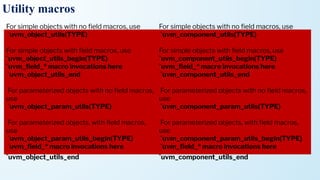
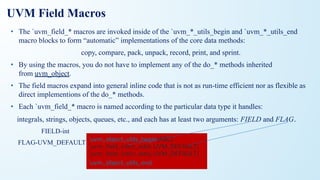
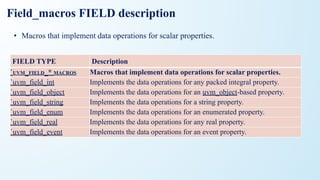
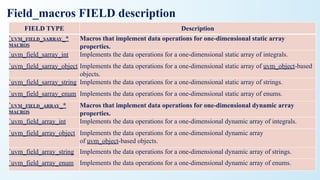
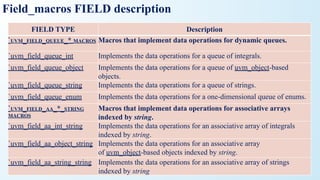
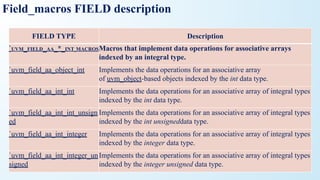
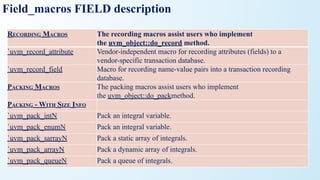
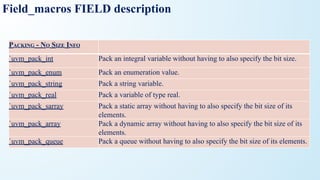
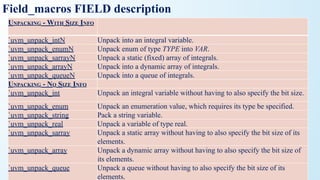
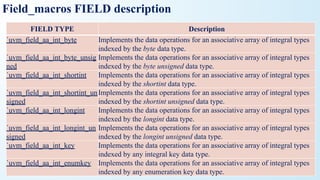
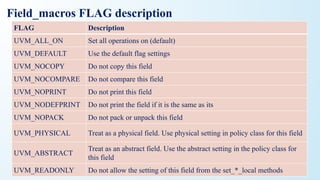
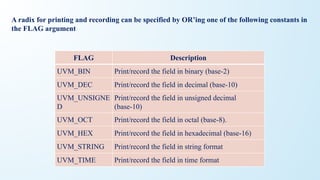
![do_methods in sequence_item
print virtual function void do_print(uvm_printer printer);
super.do_print(printer);
printer.print_string("m_bool", m_bool.name());
printer.print_field_int("m_mode", m_mode, $bits(m_mode), UVM_HEX);
printer.print_string("m_name", m_name);
endfunction
sprint `uvm_info(get_type_name(), $sformatf("Contents: %s", obj.sprint()), UVM_LOW)
convert2string virtual function string convert2string();
string contents = ""; $sformat(contents, "%s m_name=%s", contents, m_name);
$sformat(contents, "%s m_bool=%s", contents, m_bool.name());
$sformat(contents, "%s m_mode=0x%0h", contents, m_mode);
foreach(m_data[i])
Begin
$sformat(contents, "%s m_data[%0d]=0x%0h", contents, i, m_data[i]);
end
return contents;](https://image.slidesharecdn.com/uvmnewppt-260210151259-3ef9cda8/85/Universal-Verification-Methodology-Used-to-describe-the-Hardware-Digital-Circuits-109-320.jpg)