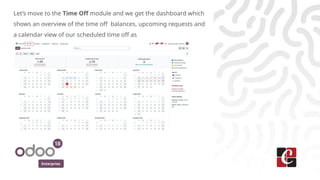
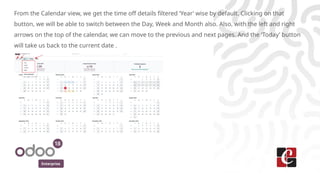
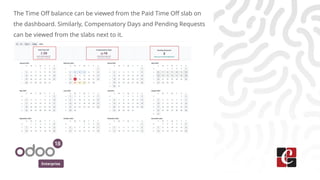
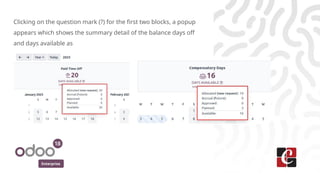
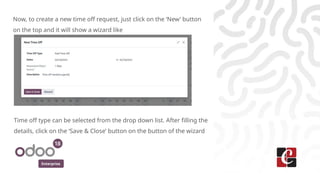
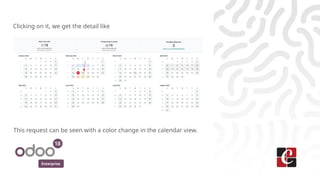
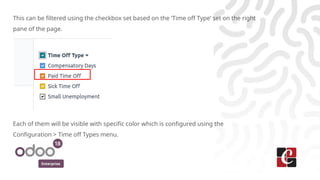
How to Track & Manage My
Time Section in Odoo 18
Time Off
Enterprise
Enterprise
Introduction
The ‘My Time’ section actually provides a central hub for all Time off
related information for the currently logged in user.
Let’s discuss this with examples using Odoo 18 instance in the coming
slides.
Enterprise
Let’s move to the Time Off module and we get the dashboard which
shows an overview of the time off balances, upcoming requests and
a calendar view of our scheduled time off as
Enterprise
From the Calendar view, we get the time off details filtered ‘Year’ wise by default. Clicking on that
button, we will be able to switch between the Day, Week and Month also. Also, with the left and right
arrows on the top of the calendar, we can move to the previous and next pages. And the ‘Today’ button
will take us back to the current date .
Enterprise
The Time Off balance can be viewed from the Paid Time Off slab on
the dashboard. Similarly, Compensatory Days and Pending Requests
can be viewed from the slabs next to it.
Enterprise
Clicking on the question mark (?) for the first two blocks, a popup
appears which shows the summary detail of the balance days off
and days available as
Enterprise
Now, to create a new time off request, just click on the ‘New’ button
on the top and it will show a wizard like
Time off type can be selected from the drop down list. After filling the
details, click on the ‘Save & Close’ button on the button of the wizard
Enterprise
Clicking on it, we get the detail like
This request can be seen with a color change in the calendar view.
Enterprise
This can be filtered using the checkbox set based on the ‘Time off Type’ set on the right
pane of the page.
Each of them will be visible with specific color which is configured using the
Configuration > Time off Types menu.
Enterprise
The Legends like Validated, To Approve and Refused can be
selected from the right pane. Also, the mandatory Days and Public
holidays will be visible below them
Enterprise
From the menu My Time > My Time Off, the user can get the details
of all the time offs created for him/ her which are in different states
with the default grouping ‘Start Date:Month’.
Enterprise
Expanding them, we get like
Enterprise
From the menu My Time > My Allocations, we get all the time off
allocations that applies to the current user. It will be euro filtered
with the currently valid allocations only as.
New allocations can be created using the ‘New’ button from the top.
For More Info.
Check our company website for related blogs
and Odoo book.
Check our YouTube channel for
functional and technical videos in Odoo.
Enterprise
www.cybrosys.com

How to Track & Manage My Time Section in Odoo 18 Time Off

  • 1.
    How to Track& Manage My Time Section in Odoo 18 Time Off Enterprise
  • 2.
    Enterprise Introduction The ‘My Time’section actually provides a central hub for all Time off related information for the currently logged in user. Let’s discuss this with examples using Odoo 18 instance in the coming slides.
  • 3.
    Enterprise Let’s move tothe Time Off module and we get the dashboard which shows an overview of the time off balances, upcoming requests and a calendar view of our scheduled time off as
  • 4.
    Enterprise From the Calendarview, we get the time off details filtered ‘Year’ wise by default. Clicking on that button, we will be able to switch between the Day, Week and Month also. Also, with the left and right arrows on the top of the calendar, we can move to the previous and next pages. And the ‘Today’ button will take us back to the current date .
  • 5.
    Enterprise The Time Offbalance can be viewed from the Paid Time Off slab on the dashboard. Similarly, Compensatory Days and Pending Requests can be viewed from the slabs next to it.
  • 6.
    Enterprise Clicking on thequestion mark (?) for the first two blocks, a popup appears which shows the summary detail of the balance days off and days available as
  • 7.
    Enterprise Now, to createa new time off request, just click on the ‘New’ button on the top and it will show a wizard like Time off type can be selected from the drop down list. After filling the details, click on the ‘Save & Close’ button on the button of the wizard
  • 8.
    Enterprise Clicking on it,we get the detail like This request can be seen with a color change in the calendar view.
  • 9.
    Enterprise This can befiltered using the checkbox set based on the ‘Time off Type’ set on the right pane of the page. Each of them will be visible with specific color which is configured using the Configuration > Time off Types menu.
  • 10.
    Enterprise The Legends likeValidated, To Approve and Refused can be selected from the right pane. Also, the mandatory Days and Public holidays will be visible below them
  • 11.
    Enterprise From the menuMy Time > My Time Off, the user can get the details of all the time offs created for him/ her which are in different states with the default grouping ‘Start Date:Month’.
  • 12.
  • 13.
    Enterprise From the menuMy Time > My Allocations, we get all the time off allocations that applies to the current user. It will be euro filtered with the currently valid allocations only as. New allocations can be created using the ‘New’ button from the top.
  • 14.
    For More Info. Checkour company website for related blogs and Odoo book. Check our YouTube channel for functional and technical videos in Odoo. Enterprise www.cybrosys.com